
HC-SR04 ultrasonic sensor is a popular and easy to use distance measuring sensor. It provides an outstanding range of 3cm to 300cm with high accuracy and stable readings. This sensor is used in several applications like obstacle-avoiding robots, object detection, burglar alarms, sonar, humidifiers, smart parking systems, etc. With its ease of interfacing with the Arduino, you’ll have your project up and running in no time
In this tutorial we will learn how the HC-SR04 ultrasonic sensor works and how to interface it with Arduino Uno.
What is HC-SR04 Ultrasonic Sensor Module
The HC-SR04 is an ultrasonic sensor module that is commonly used in electronics projects for measuring distances between the sensor and an object using sonar. They use sound waves whose frequency is greater than 20 Khz to measure the distance of an object. Ultrasonic sound is inaudible to humans.
The sensor has two main components: an ultrasonic transmitter and an ultrasonic receiver. The transmitter sends out a high-frequency sound wave, which bounces off an object and returns to the receiver. The time it takes for the sound wave to travel back to the receiver is used to calculate the distance between the sensor and the object.
The HC-SR04 sensor module typically consists of a small circuit board with two ultrasonic transducers (one for transmitting and one for receiving), a control IC, and a few other components.
Features of HC-SR04 Ultrasonic Sensor
Here are some features of the HC-SR04 ultrasonic sensor module:
-
Range: The HC-SR04 can detect objects within a range of 3 cm to 300 cm.
-
Accuracy: It has high accuracy, with a resolution of 0.3 cm.
-
Ease of use: The sensor module is easy to use, and it requires only four connections to interface with a microcontroller or other electronic device.
-
Low power consumption: The HC-SR04 operates on a voltage range of 5V DC and has low power consumption, making it suitable for battery-powered projects.
-
Non-contact measurement: The sensor measures distance without physical contact, making it ideal for applications where contact may damage the object being measured.
-
Small size: It is small in size, making it easy to integrate into a variety of projects.
Here are its main specifications:
| Operating Voltage | 5V DC |
| Operating Current | 15 mA |
| Operating Frequency | 40 KHz |
| Min Range | 3 cm |
| Max Range | 300 cm |
| Accuracy | 3 mm |
| Measuring Angle | <15° |
| Dimension | 45 x 20 x 15 mm |
HC-SR04 Ultrasonic Sensor Pinout
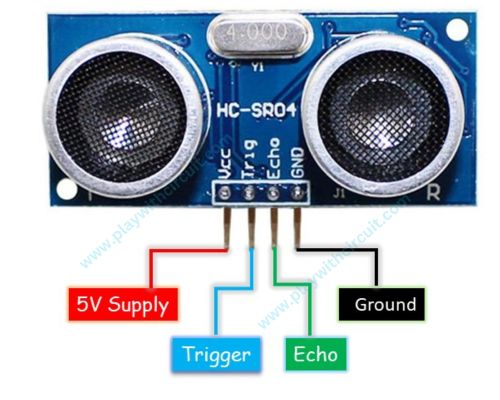
VCC It should be connected to 5V DC.
Trig It’s an input to sensor. High pulse of 10µs is applied to this pin.
Echo It’s an output of sensor. High pulse at this pin indicates time taken by sound wave to travel from transmitter to object and object to receiver. In above image left side is transmitting side and right side is receiving side.
GND This pin should be connected to ground.
HC-SR04 Ultrasonic Sensor Working
The HC-SR04 ultrasonic sensor works based on the principle of echolocation. The sensor sends out a high-frequency sound wave (typically 40 kHz) and measures the time it takes for the wave to bounce off an object and return to the sensor. This time can then be used to calculate the distance between the sensor and the object.
Here is a step-by-step explanation of how the HC-SR04 works:
Triggering the sensor: To start a measurement, a 10μs pulse is sent to the trigger pin of the sensor. This triggers the sensor to emit a burst of ultrasonic sound waves.
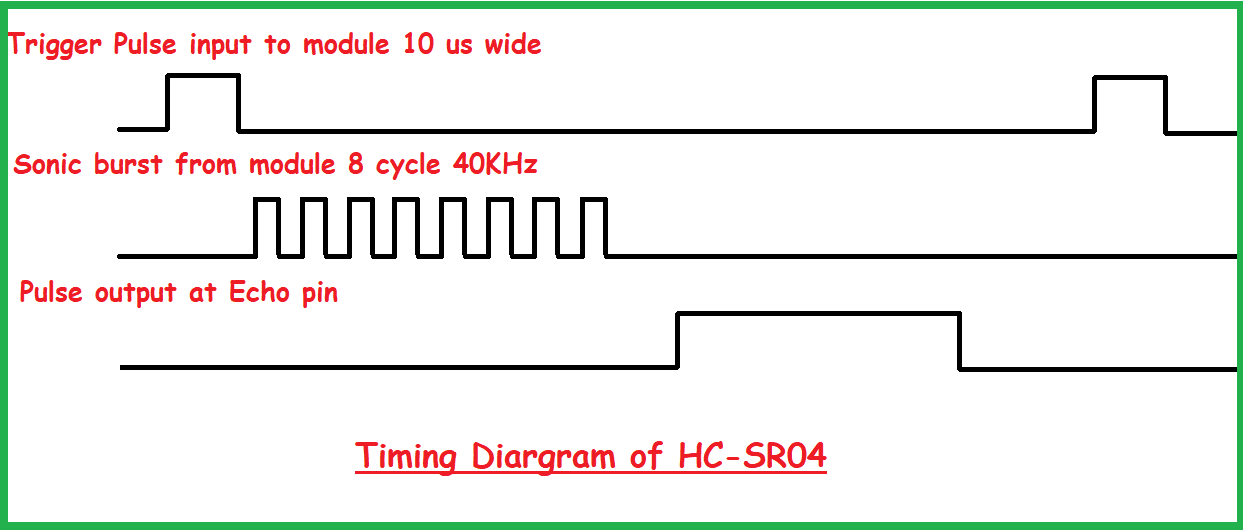
Sending the sound waves: The ultrasonic sound waves travel through the air and bounce off from any objects in their path. The sensor waits for the sound waves to bounce back.
Detecting the echoes: When the sound waves hit an object, they bounce back and are detected by the sensor’s receiver. The echo pin goes low when the signal is received. The sensor then generates an echo pulse on the echo pin, which indicates that the sound waves have been received. The width of echo pulse depends on the time taken to receive the signal.
Measuring the time: The time between the trigger pulse and the echo pulse is measured using a timer. This time corresponds to the time it takes for the sound waves to travel to the object and back.
Calculating the distance: Using the time measured in previous step, the distance to the object can be calculated using the following formula:
Distance = (Time taken by the sound wave * Speed of sound) / 2,
where, Time taken by the sound wave = Pulse width of the echo pulse, Speed of sound = 343 meters per second (at room temperature).
It can be also be calculated as: Distance (in cm) = (Echo pulse time in micro second)/ 58.309
Let’s take an example to further clarify the concept. Suppose we have an object in front of the HC-SR04 sensor at an unknown distance, and we receive a pulse of 1000µs width on the Echo pin. To calculate the distance, we have to convert the speed of sound into cm/µs, which is 0.034 cm/µs. Thus,
Distance = (0.034cm/µs × 1000µs)/2 =
Therefore, the object is 17cm away from the sensor.
Applications of Ultrasonic Sensor HC-SR04
The HC-SR04 ultrasonic sensor has a wide range of applications, including:
-
Distance measurement: The sensor is commonly used for measuring distances in robotics, automation, and other applications that require precise distance measurements.
-
Obstacle avoidance: The sensor can be used to detect obstacles and avoid collisions in robots, vehicles, and drones.
-
Object detection: The sensor can be used to detect the presence of objects in industrial automation, security systems, and other applications.
-
Level sensing: The sensor can be used to measure liquid levels in tanks, wells, and other containers.
-
Parking assistance: The sensor can be used to help drivers park their cars by detecting the distance between the car and obstacles.
-
Proximity sensing: The sensor can be used to detect the presence of people or objects in home automation systems, security systems, and other applications.
Interfacing HC-SR04 Motor Driver IC with an Arduino
Let’s Learn how to measure distance using HC-SR04 and Arduino UNO. We will be displaying calculated distance on a 16×2 lcd display in centimetres.
Hardware Required
| Name | Quantity | Remarks | Where to Buy |
|---|---|---|---|
| Arduino UNO | 1 | Revision R3 | Amazon |
| HC-SR04 | 1 | Ultrasonic Distance Sensor | Amazon |
| LCD | 1 | LCD 16 x 2 | Amazon |
| Pot | 1 | 10 kΩ | Amazon |
| Resistor | 1 | 1 kΩ | Amazon |
| Breadboard | 1 | Full size | Amazon |
| Connecting Wires | 1 | For connections | Amazon |
| USB A/B cable | 1 | To program Arduino UNO | Amazon |
| 12V Supply Adapter | 1 | For providing power to Arduino | Amazon |
Software Required
- Arduino IDE, Version 2.1.1 or above installed on your PC
- LiquidCrystal Library by Arduino, Version 1.0.7 installed in Arduino IDE
- NewPing Library by Tim Eckel, Version1.9.7 installed in Arduino IDE
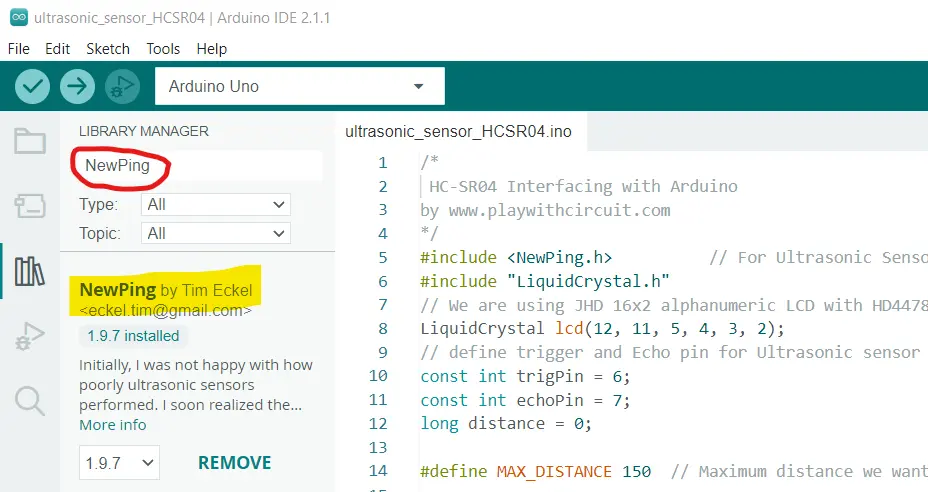
Installing NewPing Library
- Open Arduino IDE.
- Navigate to Sketch > Include Library > Manage Libraries (or press ctrl + shift + I).
- In the search bar, enter NewPing
- Look for NewPing by Tim Eckel
- Click on it and Install the Latest Version.
Circuit Diagram
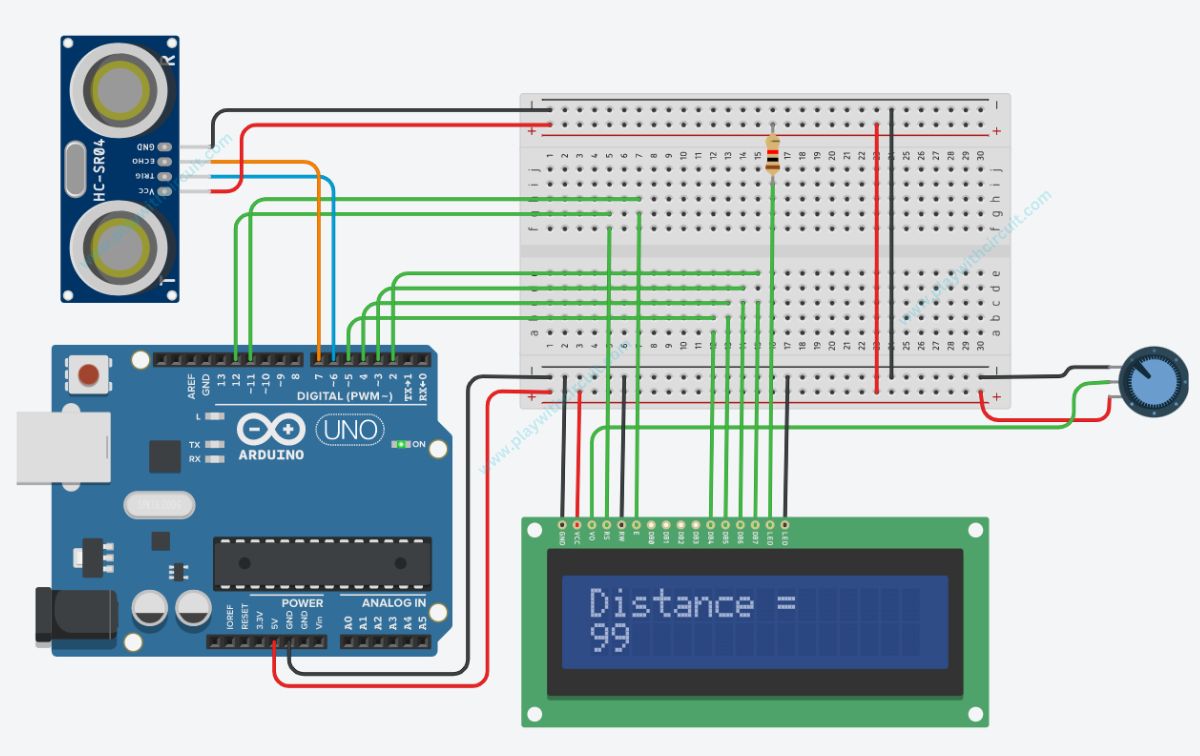
In the above diagram there is an Arduino Uno board connected to an Ultrasonic sensor and a 16×2 LCD. Distance in centimetres is calculated using Ultrasonic Sensor and it is displayed on Alphanumeric LCD.
- First pin of sensor is VCC which is connected to 5V Dc.
- Second pin, Trigger pin, is connected to pin 6 of Arduino. This pin is input for sensor and output for Arduino.
- Third pin, Echo pin is connected to pin 7 of Arduino. This pin is output for sensor and input for Arduino.
- Fourth pin of sensor is GND which is connected to Ground pin of Arduino.
To display the distance in cm, we have connected an 16×2 alphanumeric LCD.
The connection of Arduino with LCD is written below:
| LCD Side Pin | Arduino Side/ Breadboard Connection |
|---|---|
| VSS (Pin 1) | GND |
| VDD (pin 2) | VCC |
| VEE (Pin 3) | Connected to Variable pin of 10k POT to Control Contrast of LCD |
| RS (Pin 4) | 12 |
| R/W (pin 5) | GND |
| E (Pin6) | 11 |
| D0 (pin 7) | GND |
| D1 (pin 8) | GND |
| D2 (pin 9) | GND |
| D3 (pin 10) | GND |
| D4 (pin 11) | 5 |
| D5 (pin 12) | 4 |
| D6 (pin 13) | 3 |
| D7 (pin 14) | 2 |
| LED(+) (Pin 15) | Connected to VCC via 1 kΩ resistor |
| LED(-) (Pin 16) | GND |
Arduino Code 1
Here’s a simple code for measuring distance with the HC-SR04 ultrasonic sensor and Arduino. In this code we will use NewPing library.
/*
 HC-SR04 Interfacing with Arduino using  the NewPing Library
by www.playwithcircuit.com
*/
#include <NewPing.h>
// For Ultrasonic Sensor
#include "LiquidCrystal.h"
// We are using JHD 16x2 alphanumeric LCD with HD44780 controller
LiquidCrystal lcd(12, 11, 5, 4, 3, 2);

// define trigger and Echo pin for Ultrasonic sensor
const int trigPin = 6;
const int echoPin = 7;
long distance = 0;

#define MAX_DISTANCE 150  // Maximum distance we want to measure (in centimeters)

// Initialize NewPing library
NewPing sonar(trigPin, echoPin, MAX_DISTANCE);

void display(void) {
  // write column, row and counting starts from zero so 0th Colum and 1st row
  lcd.setCursor(0, 1);
  lcd.print("                ");
  // set the cursor to column 0, line 1
  // (note: line 1 is the second row, since counting begins with 0)
  lcd.setCursor(0, 1);
  lcd.print(distance);
  lcd.print(" cm");
}

void setup() {
  // set up the LCD's number of columns and rows:
  lcd.begin(16, 2);
  // Print a message to the LCD.
  lcd.print("Distance =");
  // set the trigPin as an output and echoPin as an input
  pinMode(trigPin, OUTPUT);
  pinMode(echoPin, INPUT);
  digitalWrite(trigPin, LOW); // set trigger pin to LOW
  // provide some time for the sensor to settle
  delay(500);
}
void loop() {
  distance = sonar.ping_cm();
  if (distance == 0) {
    // write column, row and counting starts from zero so 0th Colum and 1st row
    lcd.setCursor(0, 1);
    lcd.print("Out of Range    ");
  }
  else
  {
    display();    // to display calculated distance
  }
  // provide some time between readings
  delay(100);
}
Description of Code
The code begins by including the NewPing library for the ultrasonic sensor and the LiquidCrystal library for the LCD.
Then we initialize the LCD object with 12, 11, 5, 4, 3, and 2 pins. Here 12th pin and 11th pin of Arduino acts as R/S pin and Enable pin of LCD and R/W pin is directly connected to GND. In this code, we are using lcd in 4-bit mode i.e., we will be using D4, D5, D6, D7 data lines of LCD to display characters on it by using 5, 4, 3, 2 pins of Arduino board.
#include <NewPing.h>
// For Ultrasonic Sensor
#include "LiquidCrystal.h"
// We are using JHD 16x2 alphanumeric LCD with HD44780 controller
LiquidCrystal lcd(12, 11, 5, 4, 3, 2);
Now we define the trigger and echo pins for the ultrasonic sensor, and a variable for the distance. The maximum distance for measurement is set to 150 centimeters. Then we create NewPing object with the specified trigger pin, echo pin, and maximum distance.
// define trigger and Echo pin for Ultrasonic sensor
const int trigPin = 6;
const int echoPin = 7;
long distance = 0;
#define MAX_DISTANCE 150  // Maximum distance we want to measure (in centimeters)
// Initialize NewPing library
NewPing sonar(trigPin, echoPin, MAX_DISTANCE);
The display function is responsible for updating the LCD. It clears the second row, sets the cursor to the start of the second row, and prints the measured distance in centimeters.
void display(void) {
  // write column, row and counting starts from zero so 0th Colum and 1st row
  lcd.setCursor(0, 1);
  lcd.print("                ");
  // set the cursor to column 0, line 1
  // (note: line 1 is the second row, since counting begins with 0)
  lcd.setCursor(0, 1);
  lcd.print(distance);
  lcd.print(" cm");
}
In the setup function, the LCD is initialized with 16 columns and 2 rows, and “Distance =” is printed on the first row to label the measurement. The trigger pin is set as an output, and the echo pin is set as an input. The trigger pin is initially set to LOW, and a delay is introduced to allow the sensor to settle before starting measurements.
void setup() {
  // set up the LCD's number of columns and rows:
  lcd.begin(16, 2);
  // Print a message to the LCD.
  lcd.print("Distance =");
  // set the trigPin as an output and echoPin as an input
  pinMode(trigPin, OUTPUT);
  pinMode(echoPin, INPUT);
  digitalWrite(trigPin, LOW); // set trigger pin to LOW
  // provide some time for the sensor to settle
  delay(500);
}
The loop function continuously measures the distance using the ultrasonic sensor. If the measured distance is zero, indicating that the object is out of range, it updates the LCD to display “Out of Range”. Otherwise, it calls the display function to show the measured distance on the LCD.
A short delay is added between measurements to ensure the sensor has time to provide accurate readings.
void loop() {
  distance = sonar.ping_cm();
  if (distance == 0) {
    // write column, row and counting starts from zero so 0th Colum and 1st row
    lcd.setCursor(0, 1);
    lcd.print("Out of Range    ");
  }
  else
  {
    display();    // to display calculated distance
  }
  // provide some time between readings
  delay(100);
}
Arduino Code 2
In the following code we will measure distance with the HC-SR04 ultrasonic sensor and Arduino without using any library.
/*
 HC-SR04 Interfacing with Arduino without using any Library
by www.playwithcircuit.com
*/
#include "LiquidCrystal.h"
// We are using JHD 16x2 alphanumeric LCD with HD44780 controller
LiquidCrystal lcd(12, 11, 5, 4, 3, 2);
// define trigger and Echo pin for Ultrasonic sensor
const int trigPin = 6;
const int echoPin = 7;
long distance = 0;
void display(void) {
  // write column, row and counting starts from zero so 0th Colum and 1st row
  lcd.setCursor(0, 1);
  lcd.print("            ");
  // set the cursor to column 0, line 1
  // (note: line 1 is the second row, since counting begins with 0)
  lcd.setCursor(0, 1);
  lcd.print(distance);
  lcd.print(" cm");
}
void setup() {
  // set up the LCD's number of columns and rows:
  lcd.begin(16, 2);
  // Print a message to the LCD.
  lcd.print("Distance =");
  // set the trigPin as an output and echoPin as an input
  pinMode(trigPin, OUTPUT);
  pinMode(echoPin, INPUT);
  digitalWrite(trigPin, LOW); // set trigger pin to LOW
  // provide some time for the sensor to settle
  delay(500);
}
void loop() {
  // send a trigger pulse to the sensor of 10 us
  digitalWrite(trigPin, HIGH);
  delayMicroseconds(10);
  digitalWrite(trigPin, LOW);
  // measure the total duration (transmit + echo) from high time of echo pulse in microseconds
  long duration = pulseIn(echoPin, HIGH);
  // calculate the distance in centimetres
  // using formula distance = (speed * time)
  // speed of sound = 340 m/sec = 0.034 cm/microseconds
  distance = ((0.034) * (duration));
  // Here duration is calculated forward + back time hence to get object distance from sensor divide by 2
  distance = distance/2;
  display();
  // provide some time between readings
  delay(100);
}
Description of Code
In the loop function firstly we send a trigger pulse by writing trigger pin HIGH, wait for 10 microseconds and then pull the pin LOW.
This trigger induces a ultrasonic burst of 40Khz frequency on transmitter due to which HIGH pulse is received on Echo pin, which is measured by pulseIn function. This function measures high time of Echo pulse and returns its durations in microseconds.
Now distance is calculated by multiplying speed of sound with time duration of the sound to travel to the object and back. And the actual distance between object and sensor is calculated by dividing calculated distance by 2.
How to get Stable Reading in Ultrasonic Sensor?
To get stable and most accurate reading we have to apply smart filter on raw values to get most accurate data. This filter will remove spikes in readings as well as it will provide most stable reading by calculating the average of filtered readings.
filter.cpp
This smart filter helps in stabilizing the distance measurements by ignoring sudden spikes and only considering gradual changes within a specified range. It maintains a history of recent readings and uses these to compute a valid average.
/*
smart filter by www.playwithcircuit.com
*/

#define MAX_DISPLACEMENT 3
#define MAX_OUT_OF_RANGE_COUNT 5
#define MAX_RAW_CNT_CHECK 5
#define MAX_POSSIBLE_RAW_VALUE 152
#define MIN_CALCULABLE_COUNT ((MAX_RAW_CNT_CHECK / 2)+1)

long arr[MAX_RAW_CNT_CHECK] = { 0 };

long filter(long raw_value) {
  int i;
  long sum = 0;
  int count = 0;

  // static variables to save out of range count and previous reading
  static int out_of_range_cnt = 0;
  static long previous_value = 0;

  // If raw value comes greater than max range of sensor
  if (raw_value > MAX_POSSIBLE_RAW_VALUE) {
    raw_value = MAX_POSSIBLE_RAW_VALUE;
  }

  // Save the current raw value in last element of array
  arr[MAX_RAW_CNT_CHECK - 1] = raw_value;

  // rearrange the array values to remove oldest reading
  for (i = 0; i < MAX_RAW_CNT_CHECK - 1; i++) {
    arr[i] = arr[i + 1];
  }

  sum = 0;
  count = 0;

  // For loop to get sum of sum all possible Ok readings by using the logic of max change possible
  for (i = 0; i < MAX_RAW_CNT_CHECK; i++) {
    if (previous_value > MAX_DISPLACEMENT) {
      if ((arr[i] <= (previous_value + MAX_DISPLACEMENT)) || (arr[i] >= (previous_value - MAX_DISPLACEMENT))) {
        sum += arr[i];
        count++;
      }
    } else {      // if previous reading is less than max displacemnet possible
      sum += arr[i];
      count++;
    }
  }

  // Get tha average of all ok readings if we get suffcient Ok values( remove any spike)
  if((sum != 0) && (count > MIN_CALCULABLE_COUNT)) {
    previous_value = sum / count;
    out_of_range_cnt = 0;
  } else {
  // If out of range values are more then it meanse change is actual not a spike hence return current raw value
    if (out_of_range_cnt++ > MAX_OUT_OF_RANGE_COUNT) {
      previous_value = raw_value;
      out_of_range_cnt = 0;
    }
  }
  return previous_value;
}
Description of Code
Constants and Definitions
- MAX_DISPLACEMENT Defines the maximum allowable change between consecutive readings.
- MAX_OUT_OF_RANGE_COUNT Sets the maximum count of consecutive out-of-range values before accepting a new value as valid.
- MAX_RAW_CNT_CHECK Defines the number of readings stored for filtering.
- MAX_POSSIBLE_RAW_VALUE Sets the upper limit for the raw values from the sensor.
- MIN_CALCULABLE_COUNT Minimum number of valid readings required to calculate the average.
Array and Static Variables
- arr An array to store the most recent sensor readings.
- out_of_range_cnt A static variable to keep track of how many consecutive readings are out of range.
- previous_value A static variable to store the last valid reading.
Filter Function
The filter function processes the raw sensor value to produce a smoothed output.
- Handling Out-of-Range Values:
- If the raw value exceeds MAX_POSSIBLE_RAW_VALUE
, it is capped to this maximum value.
- If the raw value exceeds MAX_POSSIBLE_RAW_VALUE
- Updating the Array:
- The latest raw value is stored in the last element of the array.
- The array is then shifted left to remove the oldest reading and make room for the new one.
- Calculating the Sum of Valid Readings:
- The function iterates through the array to calculate the sum of values that are within the acceptable range of the previous_value
. This acceptable range is defined by MAX_DISPLACEMENT.
- The function iterates through the array to calculate the sum of values that are within the acceptable range of the previous_value
- Averaging Valid Readings:
- If there are enough valid readings (greater than MIN_CALCULABLE_COUNT
), the average is computed, andprevious_valueis updated with this average. Theout_of_range_cntis reset to zero. - If there are not enough valid readings, the function checks if the out_of_range_cnt exceeds MAX_OUT_OF_RANGE_COUNT. If it does, the raw value is accepted as valid, previous_value is updated, and out_of_range_cnt is reset.
- If there are enough valid readings (greater than MIN_CALCULABLE_COUNT
- Returning the Filtered Value:
- The function returns the previous_value, which is the smoothed reading.
filter.h
This is a header file that declares a function prototype for the filter function.
#ifndef __FILTER_H
#define __FILTER_H

extern long filter(long raw_value);

#endif
Description of Code
Header Guards: #ifndef __FILTER_H checks if the macro__FILTER_H is not defined. #define__FILTER_H defines the macro__FILTER_H, indicating that the contents of the header file should be included.
Function Declaration: Here we declare a function named filter that returns a long integer (long). It takes one parameter named raw_value of type long.
Closing Header Guard: #endif Ends the conditional inclusion block. If__FILTER_H was not defined (#ifndef), it is defined now (#define). If it was already defined (#ifdef), the contents between #ifndef and #endif are skipped to avoid redefinition errors.
Arduino Code 3
In the following code we will add the filter (given above) to display stable readings on LCD Display.
/*
 HC-SR04 Interfacing with Arduino without using any Library and using a smart filter
by www.playwithcircuit.com
*/
#include "LiquidCrystal.h"    // We are using JHD 16x2 alphanumneric LCD using HD44780 controller for its controller
#include "filter.h"

// initialize the library with the numbers of the interface pins
// Here We initlialize LCD in 4 bit mode when R/W pin (Pin 5 of LCD) is permanently attached to GND
// LCD side   / Arduino Side Pin
// (Pin 4 )RS = 12
// (Pin 6 )E  = 11
// (Pin 11)D4 =  5
// (Pin 12)D5 =  4
// (Pin 13)D6 =  3
// (Pin 14)D7 =  4
// Pull Up all above mentioned pins with 10kohm resistor
// Also D0(Pin 7 ),D1(Pin 8 ),D2(Pin 9 ),D3(Pin 10 ) should be attached to GND
// Pin No 1 and 16 of LCD of should be connected to GND
// Pin No 2 and 15 of LCD of should be connected to VCC
// A 10k pot should be connected b/w VCC and GND and its variable o/p pin shpuld be connected to VEE (pin 3 of LCD) to control contrast of LCD.

LiquidCrystal lcd(12, 11, 5, 4, 3, 2);

// define trigger and Echo pin for Ultrasonic sensor
const int trigPin = 6;
const int echoPin = 7;

long filtered_value = 0;
long raw_value = 0;

void display(void) {
  // write column , row and counting starts from zero so 0th colum and 1st row
  lcd.setCursor(0, 1);
  lcd.print("            ");
  // set the cursor to column 0, line 1
  // (note: line 1 is the second row, since counting begins with 0)
  lcd.setCursor(0, 1);
  lcd.print(filtered_value);
}

void setup() {

  // set up the LCD's number of columns and rows:
  lcd.begin(16, 2);

  // Print a message to the LCD.
  lcd.print("Distance =");

  // set the trigPin as an output and echoPin as an input
  pinMode(trigPin, OUTPUT);
  pinMode(echoPin, INPUT);

  digitalWrite(trigPin, LOW); // set trigger pin to LOW
  // provide some time for the sensor to settle
  delay(500);
}

void loop() {

  // send a trigger pulse to the sensor of 10 us
  digitalWrite(trigPin, HIGH);
  delayMicroseconds(10);
  digitalWrite(trigPin, LOW);

  // measure the total duration(transmit + echo) from high time of echo pulse in microseconds
  long duration = pulseIn(echoPin, HIGH);

  // calculate the distance in centimeters
  // using formula distance  =  (speed * time)
  // speed of sound  = 340 m/sec = 0.034 cm/microseconds
  raw_value =   ((0.034) * (duration));
  // Here duration is calculated forward + back time hence to get object distance from sensor divide by 2
  raw_value = raw_value/2;

  filtered_value = filter(raw_value);

  display();
  // provide some time between readings
  delay(100);
}
Description of Code
The code begins by including the LiquidCrystal library, which is essential for interfacing with the LCD.
The trigPin and echoPin for the ultrasonic sensor are defined and connected to Arduino pins 6 and 7, respectively. Two variables, raw_value and filtered_value, are initialized to store the raw and filtered distance values, respectively.
The display function is designed to update the LCD with the filtered distance value. It clears any previous readings by printing blank spaces and then sets the cursor to the appropriate position on the LCD to display the current filtered distance value.
In the setup function, the LCD is initialized with 16 columns and 2 rows, and an initial message “Distance =” is printed on the first row. The trigPin is configured as an output, and the echoPin is configured as an input. The trigger pin is set to LOW to ensure stability, and a short delay is introduced to allow the sensor to settle before starting measurements.
In the loop function, firstly the raw distance is calculated then it is passed through a filter function (from the filter.h library) that smooths out the data. The filtered distance value is then displayed on the LCD using the display function. A short delay is introduced between readings to ensure stable and continuous updates.
Project Demonstration
FAQ’S
What is the ultrasonic sensor HC-SR04 used to detect?
The HC-SR04 ultrasonic sensor is primarily used to detect the presence and distance of objects in its vicinity. It utilises ultrasonic sound waves to measure distances.
How do I connect an ultrasonic sensor to my Arduino Uno?
To connect an ultrasonic sensor, such as the HC-SR04, to an Arduino Uno, you need to connect the VCC pin of the sensor to the 5V pin on the Arduino, the GND pin of the sensor to the GND pin on the Arduino, the Trig pin of the sensor to a digital pin on the Arduino (e.g., pin 2), and the Echo pin of the sensor to another digital pin on the Arduino (e.g., pin 3). Then, you can write the code to control the sensor, including defining the pins as input and output, sending trigger signals, measuring the echo time, and calculating the distance.
How to measure distance with Arduino using ultrasonic sensor?
It measures distance by sending and receiving the ultrasonic wave. The sensor emits ultrasonic sound waves and measures the time it takes for the waves to bounce back after hitting an object. Based on the measured time, the sensor can calculate the distance to the object within its detection range. We can calculate the distance travelled by the sound wave as
Formula: Distance = Speed * Time
What is the detection range of HC-SR04 ultrasonic sensor?
The HC-SR04 ultrasonic sensor has a typical detection range of 3 cm to 300 cm. This range can vary depending on factors such as the ambient conditions, the object’s size and shape, and the angle of incidence.
