
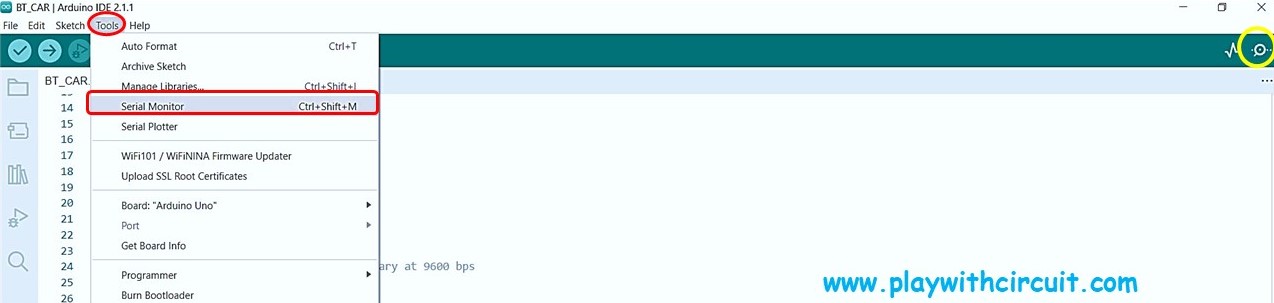
The Serial Monitor in Arduino is a powerful tool for debugging and communication between your Arduino board and your computer. It allows you to send and receive data in real-time, which is incredibly useful for debugging your code and monitoring the behaviour of your Arduino project.
The Serial UART Port which needs three pins for communication Tx , Rx and Gnd Pin can be used to communicate with PC as well as it can be used to communicate with other microcontrollers. RF modules like Bluetooth, and Zigbee modules often use serial communication to exchange data with the microcontroller for wireless connectivity. GPS receivers can provide location data to a microcontroller through serial communication.
In this tutorial, we’ll discuss Arduino UART Serial Communication and core library functions of the serial UART Port of Arduino along with examples.
Basic Library Functions related to Serial UART Interface
There are many library functions associated with Serial Port functionality given below:
- if(Serial)
- Serial.available()
- Serial.availableForWrite()
- Serial.begin()
- Serial.end()
- Serial.find()
- Serial.findUntil()
- Serial.flush()
- Serial.parseFloat()
- Serial.parseInt()
- Serial.peek()
- Serial.print()
- Serial.println()
- Serial.read()
- Serial.readBytes()
- Serial.readBytesUntil()
- Serial.readString()
- Serial.readStringUntil()
- Serial.setTimeout()
- Serial.write()
- Serial.serialEvent()
Basic functions which are frequently used are explained below:
Serial.begin()
Serial.begin() function is used to initialize serial communication and configure the serial data transmission parameters. It is essential for establishing reliable communication between the Arduino board and external devices such as computers, sensors, displays, or other microcontrollers.
❕Note
- When there is Second Serial Port available in other Arduino boards then Serial1.begin() function will be used.
- When there is Third Serial Port available in other Arduino boards then Serial2.begin() function will be used.
- When there is Fourth Serial Port available in other Arduino boards then Serial3.begin() function will be used.
💡Must Read
What is UART and How it Works?
This article will give you more in-depth information about UART communication protocol and its configuration parameters.
Syntax:
Serial.begin(baudrate);
Serial.begin(baudrate,config)
Parameters:
Serial Here “Serial” is serial port object. In every functionality it will be used.
Baudrate Baudrate refers to speed of communication, how many bits transferred per second from sender to receiver.
❕Note
Baud rates supported by Arduino UNO are: 300, 600, 1200, 2400, 4800, 9600, 14400, 19200, 28800, 31250, 38400, 57600, 115200.
Configuration:
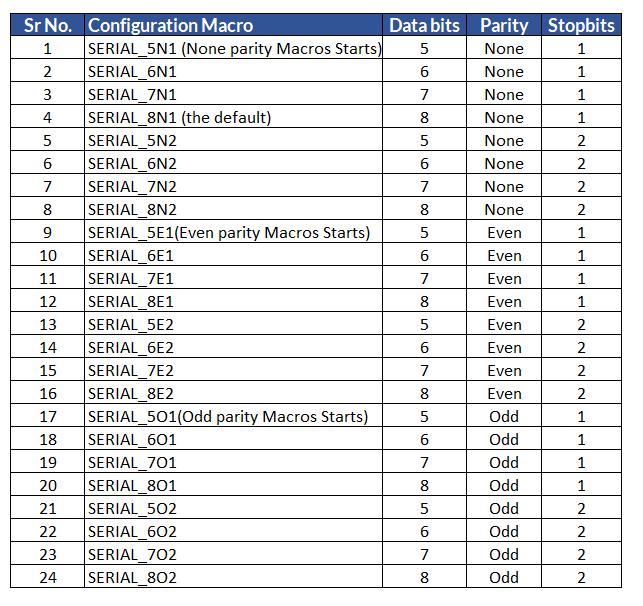
When we do not specify configuration i.e., parity, stop bits and data bits then default data bits i.e., 8, default parity i.e., none and default stop bits i.e., 1 is considered for the communication.
Here is a list of all configuration MACROS which can be given explicitly:
Returns: It returns nothing.
Example:
In this example Serial UART port of Arduino is being initialized at baud rate 9600 at default parity and stop bits:
void setup() {
  // Initialize serial communication at a baud rate of 9600,n,8,1
  Serial.begin(9600);
}

void loop(){
  Serial.print("Hello World");
  while(1);
}
Output:
Hello World
❕Note: Here while(1) in the loop function ensures the loop executes only once.
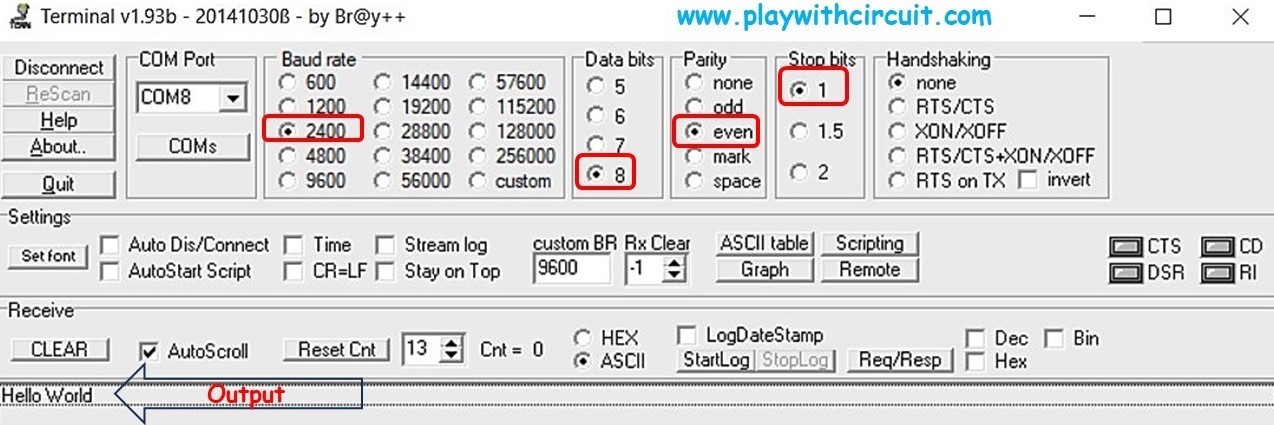
Here is another code to initialize UART at baud rate 2400, 8 data bits, at even parity with 1 stop bits.
void setup() {
  // Initialize serial communication at a baud rate of 2400,8 data bits,at even parity with 1 stop bits
  Serial.begin(2400,SERIAL_8E1);
}

void loop(){
  Serial.print("Hello World");
  while(1);
}
Output:
Arduino Serial monitor is only capable of changing baudrate, when other configuration parameters change then it is unable to capture data hence another serial terminal software is needed to do so.
Here is the output:
Serial.print()
Serial.print() is used to send data from Arduino to an external device, such as a computer running the Arduino IDE’s Serial Monitor. It allows you to send a wide range of data types, including numbers, characters, and strings, to monitor and debug your Arduino projects.
Syntax:
Serial.print(data)
Serial.print(data, format)
Parameters:
data The data you want to send, which can be of various types, such as integers, floats, characters, strings, etc.
format Format can be BIN, OCT, HEX, DEC or it can be skipped. If the data is ASCII character, then by default DEC is considered as format.
Returns: It returns number of bytes written to UART serial port, reading its return is optional.
Example:
In this example we are using the function to send float value, character and sting and after receiving the number of bytes sent. We are also printing it.
void setup() {
  // Initialize serial communication at 9600 baud
  Serial.begin(9600);
}

void loop() {
  // Send various types of data to the Serial Monitor
  int sensorValue = analogRead(A0);  // Read an analog sensor
  float temp = 25.5;                 // A floating-point temperature value
  char myChar = 'X';                 // A character
  String message = "Hello World!";   // A string
  size_t msglength = 0;

  // Sending data using Serial.print()
  Serial.print("Analog Sensor Value: ");
  Serial.print(sensorValue);
  Serial.print(", Temperature: ");
  Serial.print(temp, 1);  // Display temperature with 1 decimal place
  Serial.print(", Character: ");
  Serial.print(myChar);
  Serial.print(", Message: ");
  msglength = Serial.print(message);  // Use println() to add a newline at the end
  Serial.print(", Message Length : ");
  Serial.println(msglength);
  delay(1000);
}
Output:
Analog Sensor Value: 442, Temperature: 25.5, Character: X, Message: Hello World!, Message Length : 12
Analog Sensor Value: 416, Temperature: 25.5, Character: X, Message: Hello World!, Message Length : 12
Analog Sensor Value: 394, Temperature: 25.5, Character: X, Message: Hello World!, Message Length : 12
Analog Sensor Value: 375, Temperature: 25.5, Character: X, Message: Hello World!, Message Length : 12
Analog Sensor Value: 359, Temperature: 25.5, Character: X, Message: Hello World!, Message Length : 12
Analog Sensor Value: 345, Temperature: 25.5, Character: X, Message: Hello World!, Message Length : 12
Explanation:
We can see that at every 1000 ms delay the Analog Sensor value changes. This is because nothing is connected at sensor i.e., analog input pin is floating hence it is giving any random value.
Serial.println()
Serial.println() is used to print data to the serial port as human-readable ASCII text, with the added benefit of automatically adding a newline character (‘\n’) at the end of the printed data. This newline character moves the cursor to the next line, making the output more readable.
Syntax:
Serial.println(data)
Serial.println(data, format)
Parameters: Same as above Serial.print() function.
Returns: It returns number of bytes written to UART serial port, reading its return is optional.
Example:
In this example, in the loop() function, we use Serial.println(“Hello World!”); to send the string “Hello World!” to the Serial Monitor.
The key difference with println() compared to print() is that it automatically adds a newline character (‘\n’) at the end of the printed data. This means that after “Hello World” is printed, the cursor moves to the next line.
void setup() {
// Initialize serial communication at 9600 baud
Serial.begin(9600);
}
void loop() {
String message = "Hello World!"; // A string
size_t msglength = 0;
// Send a message and its length to the Serial Monitor with println()
msglength = Serial.println(message);
Serial.print("Message Length in Binary: ");
Serial.println(msglength, BIN);
Serial.print("Message Length in Octal: ");
Serial.println(msglength, OCT);
Serial.print("Message Length in Decimal: ");
Serial.println(msglength, DEC);
Serial.print("Message Length in Hexadecimal: ");
Serial.println(msglength, HEX);
while (1); // Stop here in infinite while loop
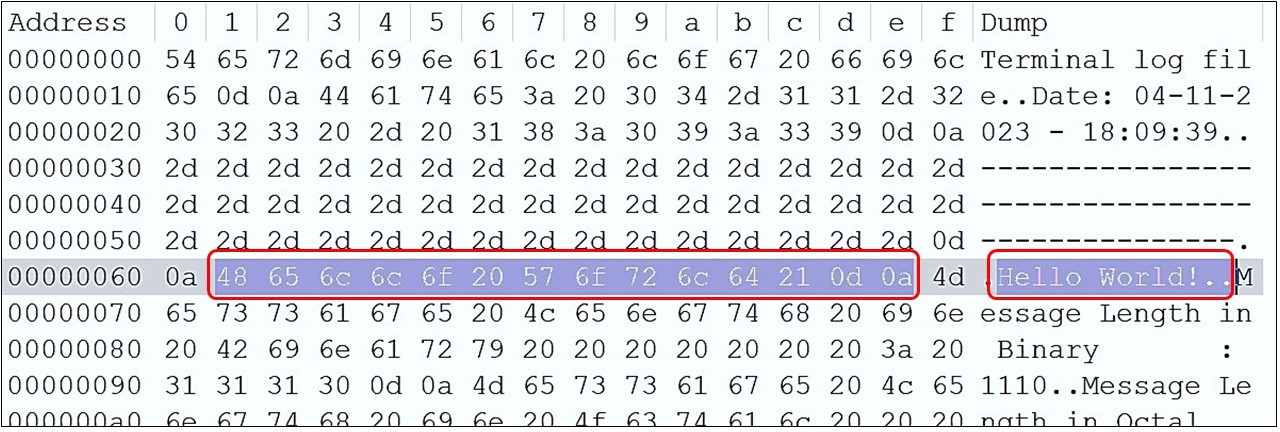
}Output:
Hello World!
Message Length in Binary: 1110
Message Length in Octal: 16
Message Length in Decimal: 14
Message Length in Hexadecimal: E
Explanation:
Here one thing needs to be noted that length returned by sending string “Hello World!” is different in Serial.print() (it is 12) and Serial.println() (it is 14) function.
The reason is that when “Hello World!” is sent using Serial.println() function two more characters 0x0D and 0x0A are being sent which are Carriage return and Line feed characters respectively.
Serial.write()
Serial.write() is used to write binary data to the serial port. Unlike Serial.print(), which sends human-readable data as ASCII characters, Serial.write() sends raw binary data, allowing you to send non-text data, such as bytes, integers, or arrays, without any special formatting.
Syntax:
Serial.write(val)
Serial.write(str)
Serial.write(buf, len)
Parameters:
val a value to send as a single byte.
str a string to send as a series of bytes.
buf an array to send as a series of bytes.
len the number of bytes to be sent from the array.
Returns: It returns the number of bytes written.
Return Data type: size_t.
Example:
Here is an example in which Hex character array, decimal character array and String is being sent.
void setup() {
  // Initialize serial communication at 9600 baud
  Serial.begin(9600);
}

void loop() {
  // Send binary data using Serial.write()

  byte myData[] = { 0x41, 0x42, 0x43 };  // An array of bytes (hexadecimal values 'A', 'B', 'C')
  byte myData2[] = { 49, 50, 51 };  // An array of bytes (Decimal values '1', '2', '3')

  // Send the entire array of Hex characters using Serial.write()
  Serial.write(myData, sizeof(myData));

  Serial.write(0x0D);Serial.write(0x0A);   // Carriage return  and Linefeed

  // Send the entire array of decimal characters using Serial.write()
  Serial.write(myData2, sizeof(myData2));

  Serial.write(0x0D);Serial.write(0x0A);   // Linefeed and Carriage return

  Serial.write("Hello");

  while(1);       // stay here for indefinite time
}
Output:
ABC
123
Hello
Serial.end()
Serial.end() is used to stop and disable serial communication on the specified serial port (Serial, Serial1, etc.). It is particularly useful if you want to free up hardware resources (such as pins and memory) that are allocated for serial communication.
Syntax:
Serial.end()Parameters: None
Returns: Nothing
Example:
Here, in below code Serial.end() function is called when a condition is met:
void setup() {
  Serial.begin(9600);  // Initialize serial communication at 9600 baud
  Serial.println("Serial Communication Enabled");
}

void loop() {
  bool boEndSerial = true;

  Serial.println("Hello World");
  if (boEndSerial == true) {  // this condition depends on the use
    Serial.println("Disabling Serial Communication");
    Serial.end();  // Disable serial communication
  }
  while (1);
}
Output:
Serial Communication Enabled
Hello World
Disabling Serial Communication
Serial.flush()
Serial.flush() function is used to ensure that all outgoing serial data has been transmitted before the program continues executing. It waits until the transmission buffer is empty to ensure that all data in the serial transmission buffer has been sent before proceeding with other code.
Syntax:
Serial.flush()Parameters: None
Returns: Nothing
Example:
void setup() {
  Serial.begin(9600);  // Initialize serial communication at 9600 baud
}

void loop() {
  // Send data to the serial port
  Serial.println("Hello, Arduino!");
  // Wait for data to be transmitted before continuing
  Serial.flush();
  // Continue with more code
  while(1);
}
Output:
Hello, Arduino!
Serial.available()
Serial.available() is a function used to check the number of bytes (characters) available for reading in the input buffer of the serial communication port. It is used to determine if there is data ready to be read from the serial port. It helps you avoid blocking your program by ensuring that there’s data available for reading before attempting to read it.
Syntax:
Serial.available()Parameters: None
Returns: Number of bytes in Rx buffer of Serial Port.
Serial.read()
Serial.read() is a function used to read data from the serial communication port into your Arduino program. It retrieves a single byte of data (typically a character) from the input buffer and allows you to process or store that data in your program.
Syntax:
Serial.read()Parameters: None
Returns: It returns the first byte of incoming serial data available in Rx buffer if any data is available, else it returns ‘-1’ if no data is available.
Return Data type: int
Example:
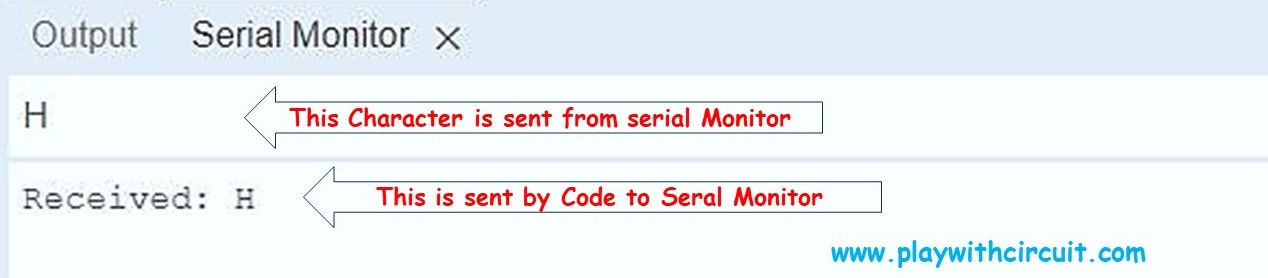
Serial.avaialable() and Serial.read() are usually used with each other like in the example below. Usually, availability check is made before reading the character. In this example return type is character because its known character data is expected.
void setup() {
  Serial.begin(9600);  // Initialize serial communication at 9600 baud
}

void loop() {
  if (Serial.available() > 0) {
    char receivedChar = Serial.read();  // Read a character from the serial port
    // Do something with the received character
    Serial.print("Received: ");
    Serial.println(receivedChar);
  }
}
Output:
Serial.parseInt()
parseInt() reads an integer (whole number) from the serial input one byte at a time in search of the first valid numerical digit.
Where there is no integer value to get then zero(0) will be returned.
There will be a delay after which 0 will be returned, this timeout will be defined by Serial.setTimeout() function.
Syntax:
Serial.parseInt()
Serial.parseInt(lookahead)
Serial.parseInt(lookahead, ignore)
Parameters:
Lookahead It is a mode in which Serial.parseInt() function will be used.
There are three modes:
-
SKIP_ALL: It is the default mode and Serial.parseInt() is same as writing Serial.parseInt(SKIP_ALL). In this mode all characters other than digits or a minus sign are ignored when scanning Rx buffer of Arduino.
-
SKIP_NONE: In this mode nothing is skipped if the first character is the non-integer digit then it returns zero.
-
SKIP_WHITESPACE: In this mode only tabs, spaces, line feeds, and carriage returns are skipped, if they comes before the integer value in Rx buffer.
Ignore: Sometimes integer is written like this 10,000 (Ten Thousand) hence if we want to tell to function that a comma(,) can be skipped in the integer value then provide ‘,’ character as ignore character.
Returns: It returns the valid integer number of type int.
Example1:
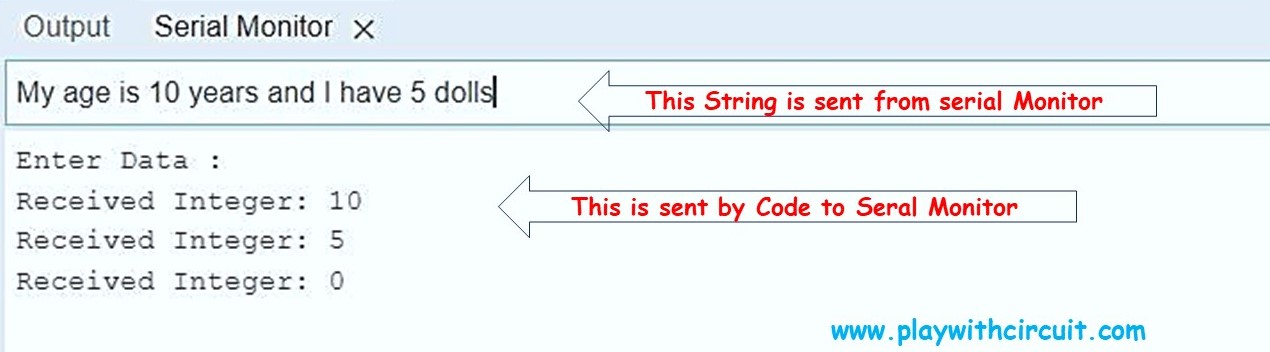
The following code is written to read the integer value sent from Arduino Serial Monitor window. The string which is sent from the Serial Monitor window is “My age is 10 and I have 5 dolls”.
void setup() {
  Serial.begin(9600);  // Initialize serial communication at 9600 baud rate
  Serial.println("Enter Data:");
}

void loop() {
  if (Serial.available() > 0) {             // Check if there's data available to read
    int receivedValue = Serial.parseInt();  // Read and parse an integer from serial input

    if (Serial.read() == '\n') {  // Check for a newline character to determine the end of the number
      // Now, you can work with the received integer
      Serial.print("Received Integer: ");
      Serial.println(receivedValue);
    }
  }
}
Output:
Explanation:
In this example, in the loop() function, we check if there’s data available to read from the serial input using Serial.available(). If there is data available (i.e., if Serial.available() is greater than 0), we use Serial.parseInt() to read and parse an integer from the serial input.
So when Arduino receives “My age is 10 years and I have 5 dolls.” in the serial receive buffer, only 10 gets returned when Serial.parseInt() function is called. It will stop searching for any other integer when it finds something that cannot be converted to integer value. But when parseInt() function gets called in loop as shown in this example then next time it would return 5 and the next time it will return 0 because if no valid digits were read before the time-out then 0 is returned. Since after 10, 5 there is no integer present in the input buffer hence the third return from the Serial.parseInt() function is 0.
Example 2:
When the same above program is used with SKIP_NONE parameter and same input string.
void setup() {
  Serial.begin(9600);  // Initialize serial communication at 9600 baud rate
  Serial.println("Enter Data :");
}

void loop() {
  if (Serial.available() > 0) {             // Check if there's data available to read
    int receivedValue = Serial.parseInt(SKIP_NONE);  // Read and parse an integer from serial input
    // Now, you can work with the received integer
    Serial.print("Received Integer: ");
    Serial.println(receivedValue);
  }
}
Output:
Received Integer: 0
Received Integer: 0
Received Integer: 0
Received Integer: 0
Received Integer: 0
Received Integer: 0
Received Integer: 0
.
.
.
.
.
Explanation:
“Received Integer: 0” will be printed indefinitely when the input is “My age is 10 years and I have 5 dolls”.
As nothing will be skipped and 0 will be returned, no further parsing is done hence Serial.available() will always be greater than 0.
When Input is changed:
When the Input is different e.g., directly “1000” is received in input buffer.
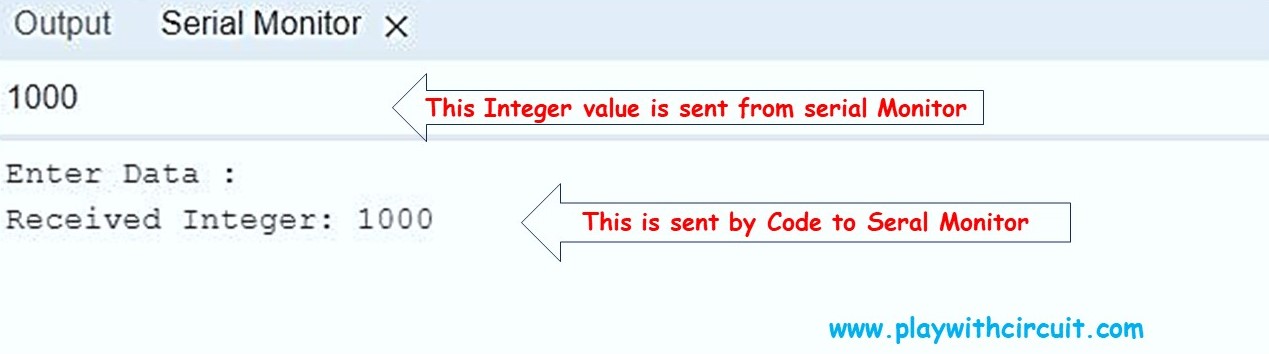
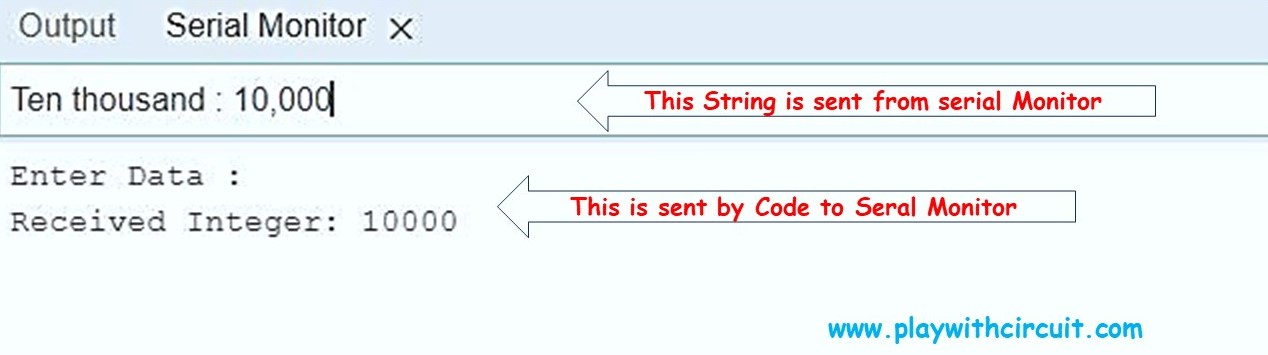
Example 3:
When “Ten Thousand : 10,000” is sent from the Serial monitor and the ignored character is ‘,’ . Then code will be successfully able to parse 10000 integer value from the string sent.
void setup() {
  Serial.begin(9600);  // Initialize serial communication at 9600 baud rate
  Serial.println("Enter Data :");
}

void loop() {
  if (Serial.available() > 0) {             // Check if there's data available to read
    int receivedValue = Serial.parseInt(SKIP_ALL,',');  // Read and parse an integer from serial input
    // Now, you can work with the received integer
    Serial.print("Received Integer: ");
    Serial.println(receivedValue);
  }
}
Output:
Serial.parseFloat()
parseFloat() is used to read and parse floating-point numbers (numbers with decimal points) from the serial input. It returns the first valid floating-point number from the Serial buffer. It’s similar to parseInt(), but it allows you to work with numbers that have decimal places.
Syntax:
Serial.parseFloat()
Serial.parseFloat(lookahead)
Serial.parseFloat(lookahead, ignore)
Parameters: Same as above Serial.parseInt() function.
Returns: It returns the valid decimal number of type float.
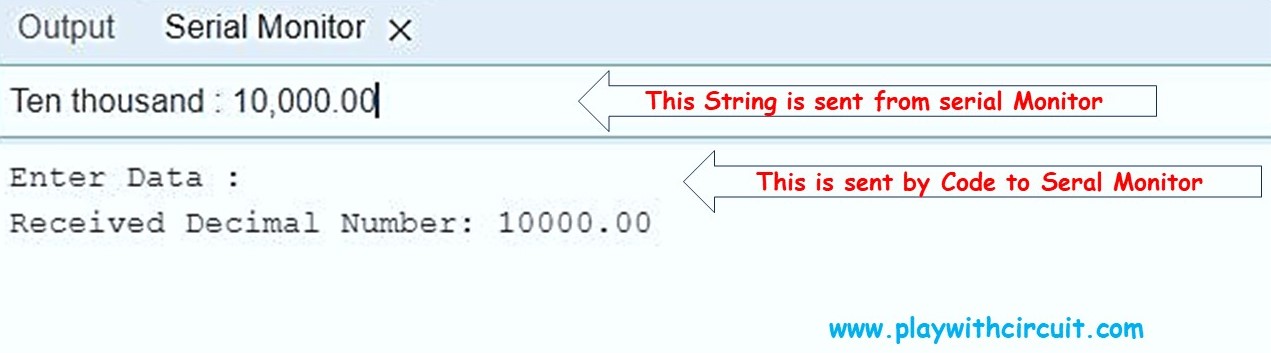
Example:
The following code is written to read the float value sent from Arduino Serial Monitor window. The string which is sent from the Serial Monitor window is “Ten Thousand : 10,000.00”.
void setup() {
  Serial.begin(9600);  // Initialize serial communication at 9600 baud rate
  Serial.println("Enter Data:");
}

void loop() {
  if (Serial.available() > 0) {                       // Check if there's data available to read
    float receivedValue = Serial.parseFloat(SKIP_ALL,',');  // Read and parse an decimal from serial input
    // Now, you can work with the received integer
    Serial.print("Received Decimal Number: ");
    Serial.println(receivedValue);
  }
}
Output:
Serial.setTimeout()
Serial.setTimeout() is a function in Arduino that allows you to specify a timeout duration for reading data from the serial input. This timeout is particularly useful when you are waiting for data to arrive over the serial communication, and you want to set a maximum duration for how long your Arduino should wait for that data.
Here is the list of the Serial functions that use the timeout value which is set by function Serial.setTimeout():
- Serial.find()
- Serial.findUntil()
- Serial.parseInt()
- Serial.parseFloat()
- Serial.readBytes()
- Serial.readBytesUntil()
- Serial.readString()
- Serial.readStringUntil()
Syntax:
Serial.setTimeout(time_in_milliseconds)Parameters: time_in_milliseconds: timeout duration in milliseconds.
Parameter data type: long
Returns: Nothing
Serial.readBytes()
Serial.readBytes() is a function in Arduino that allows you to read a specified number of bytes from the serial input and store them in a buffer (an array of bytes). This function is useful when you want to receive a fixed number of bytes or a data packet of a known size over the serial communication.
Syntax:
Serial.readBytes(buffer, length)Parameters
buffer A pointer to the buffer (array) where the received bytes will be stored.
length The number of bytes to read and store in the buffer.
Returns: The number of bytes placed in the buffer.
Return Data type: size_t.
Example:
Here is a combined example of Serial.readBytes() and Serial.setTimeout() Function of Serial library. In this example, 5 bytes are expected to be received from the Rx buffer.
byte receivedData[10] = { 0 };  // Create a byte array to store received data
int dataLength = 5;             // the number of bytes received

void setup() {
  Serial.begin(9600);
  Serial.setTimeout(3000);
}

void loop() {
  dataLength = Serial.readBytes(receivedData, 5);  // Read and store the specified number of bytes
  if (dataLength > 0) {
    // Process the received data
    Serial.print("Received Data : ");

    for (int i = 0; i < dataLength; i++)
      Serial.print(receivedData[i]);

    Serial.println(" ");
    Serial.print("Received Data Length: ");
    Serial.println(dataLength);
  } else {
    Serial.println("No Data Received");
    Serial.print("Received Data Length: ");
    Serial.println(dataLength);
  }
}
Output:

Explanation:
In the loop() function, we are checking if there are enough bytes available to read in the serial buffer using Serial.available().
We then use Serial.readBytes() to read the specified number of bytes (in this case, 5 bytes) from the serial input and store them in the receivedData array.
We print the received data to the serial monitor for debugging purposes. You can see the individual bytes in the received data array.
If the required number of bytes are not received before timeout then whatever number of bytes are received, it is received in buffer. If no bytes are received before timeout then nothing will be stored in buffer and return bytes will be zero(0).
Hence when the data is not sent “No Data Received” and “Received Data Length: 0 is printed on serial monitor.
When the data is received, its printed and after that when nothing is sent then again sent “No Data Received” and “Received Data Length: 0 is printed on serial monitor.
Serial.readBytesUntil()
Serial.readBytesUntil() is a function in Arduino that allows you to read a sequence of bytes (characters) from the serial input until a specified “terminating” character is encountered. It’s particularly useful when you want to receive data packets that are terminated with a specific character or delimiter.
The function returns in three conditions:
- If the time is complete.
- If the maximum length specified is received.
- If the terminating character is encountered.
Syntax:
Serial.readBytesUntil(character, buffer, length)Parameters:
- character The character that marks the end of the data packet. Reading stops when this character is encountered.
- buffer An array where the received bytes will be stored.
- length The maximum number of bytes to read and store in the buffer.
Returns: It returns the number of bytes read.
Return Data type: size_t.
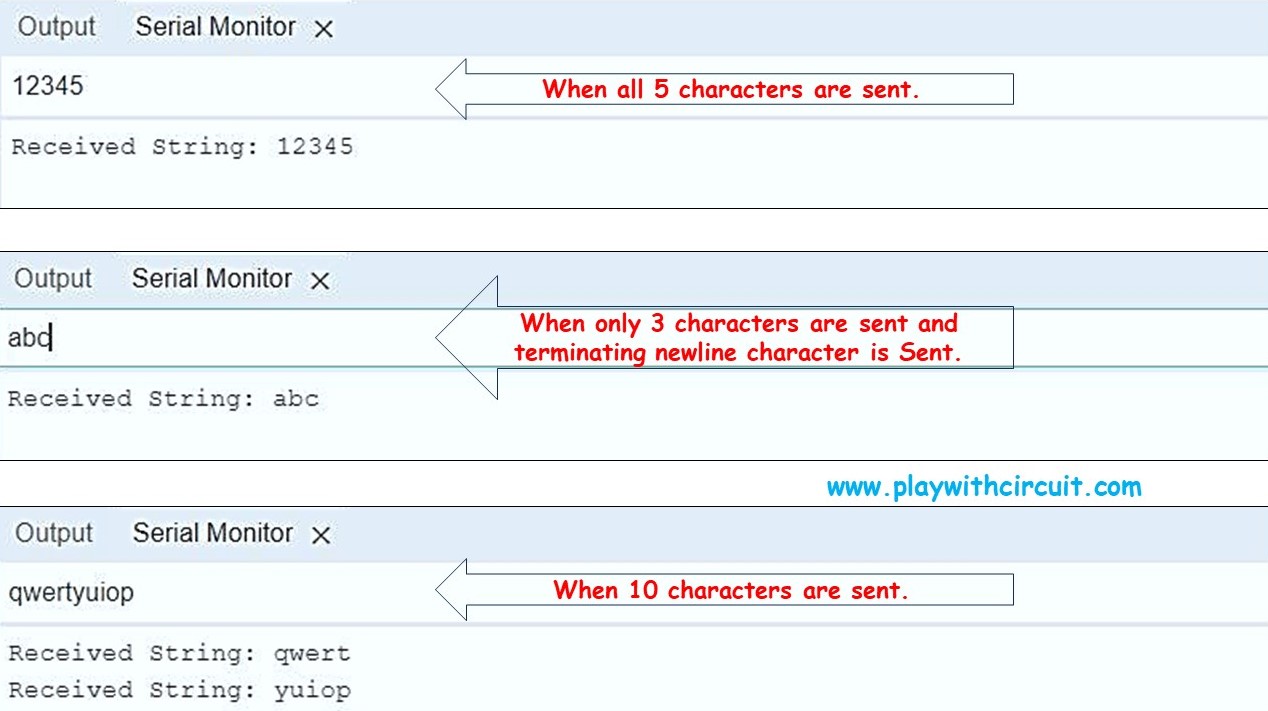
Example:
Let’s say you want to receive a string terminated by a newline character (‘\n’):
char receivedString[20]; // Create a character array to store received string
char terminator = '\n';  // Specify the terminating character

void setup() {
  Serial.begin(9600);  // Initialize serial communication at 9600 baud rate
}

void loop() {
  if (Serial.available() > 0) {  // Check if data is available to read
    int bytesRead = Serial.readBytesUntil(terminator, receivedString, 5);

    if (bytesRead > 0) {                 // Check if any bytes were read
      receivedString[bytesRead] = '\0';  // Null-terminate the received string

      // Process the received string
      Serial.print("Received String: ");
      Serial.println(receivedString);
    }
  }
}
Output:
Here are a few outputs based on the string entered.
if(Serial)
if(Serial) is used to check if the serial communication is active. After calling Serial.begin() it can be called in while loop to check if the serial communication has been activated or not.
Syntax:
if (Serial) or it can be used like this while(!Serial);Parameters: None
Returns: Serial can have two values either true or false.
Serial.readString()
Serial.readString() reads characters from the serial buffer into a String. The function terminates if it times out.
It simplifies the process of receiving and handling strings of text over the serial communication interface.
Syntax:
Serial.readString()Parameters: None
Returns: A string received in the serial buffer.
serialEvent()
serialEvent() is used to handle serial communication asynchronously. It allows you to process incoming serial data in the background without blocking the main loop() function. This is particularly useful when you want to continuously listen for and respond to incoming data from a connected computer or device without causing delays in your program’s execution. We don’t have to call Serial.available() when we use this functionality.
Syntax:
void serialEvent() {
  // what ever happens at serial event write here
}
Add this function after loop function.
Example:
Here is an example to show functionality of if(Serial), Serial.readString() as well as serialEvent():
String receivedString;  // Create a String to store received string

void setup() {
  Serial.begin(9600);  // Initialize serial communication at 9600 baud rate
  while (!Serial);     // wait here until Serial Communication is UP
}

void loop() {
  // use it for other functionality
}

void serialEvent() {
receivedString = Serial.readString();
    // Process the received string
    Serial.print("Received String: ");
    Serial.println(receivedString);
}
Output:
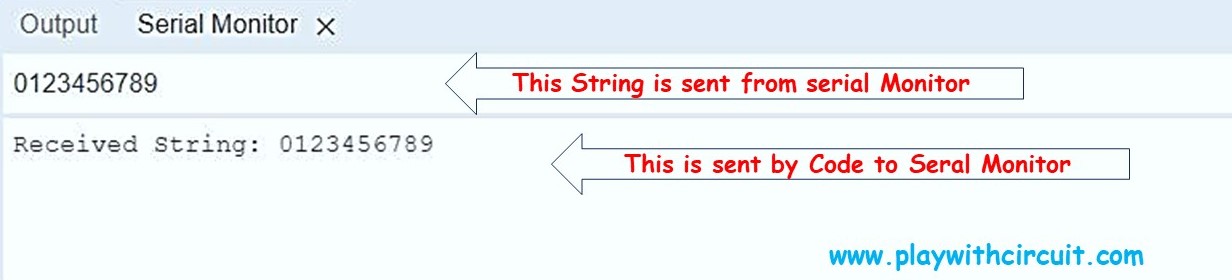
Explanation:
In the setup function,
while (!Serial);
is used to wait in while loop until serial communication is active.
If Serial port is not initialized then program will stuck here forever.
In above program loop() function can be used to do other functionality of the requirement.
As soon as string is received serialEvent Function will be called and hence string is received using Serial.readString() function and thereby printed using Serial.println() function.


