

In Arduino programming, functions are powerful tools that enable us to organize and simplify the code by dividing the code into reusable segments. A function is usually created when a task is to be performed at multiple places in the code. Instead of writing the same code multiple times, you can define a function and call it whenever you need that specific operation to be executed.
Functions help break down a complex program into smaller, more manageable parts. Each function can focus on a specific task, making it easier to understand, test, and debug. This modularity also simplifies code maintenance.
Functions can be built-in, provided by the Arduino library, or custom-defined by the programmer. They are essential for creating structured and efficient Arduino programs.
Benefits of Functions
- Modularity: Functions break down a program into smaller, more manageable parts, improving code structure.
- Reusability: Functions allow you to use the same code multiple times, reducing redundancy.
- Readability: Well-named functions make code more understandable and self-explanatory.
- Testing and Debugging: Functions simplify testing and debugging by focusing on one task at a time.
- Code Organization: Functions structure code logically, improving organization.
- Library and API Development: Functions are essential for creating clear interfaces in libraries and APIs, promoting code reuse.
Syntax of Function
return_type function_name(parameters) {
    // Function body
    // Code to perform the task
    return result;
}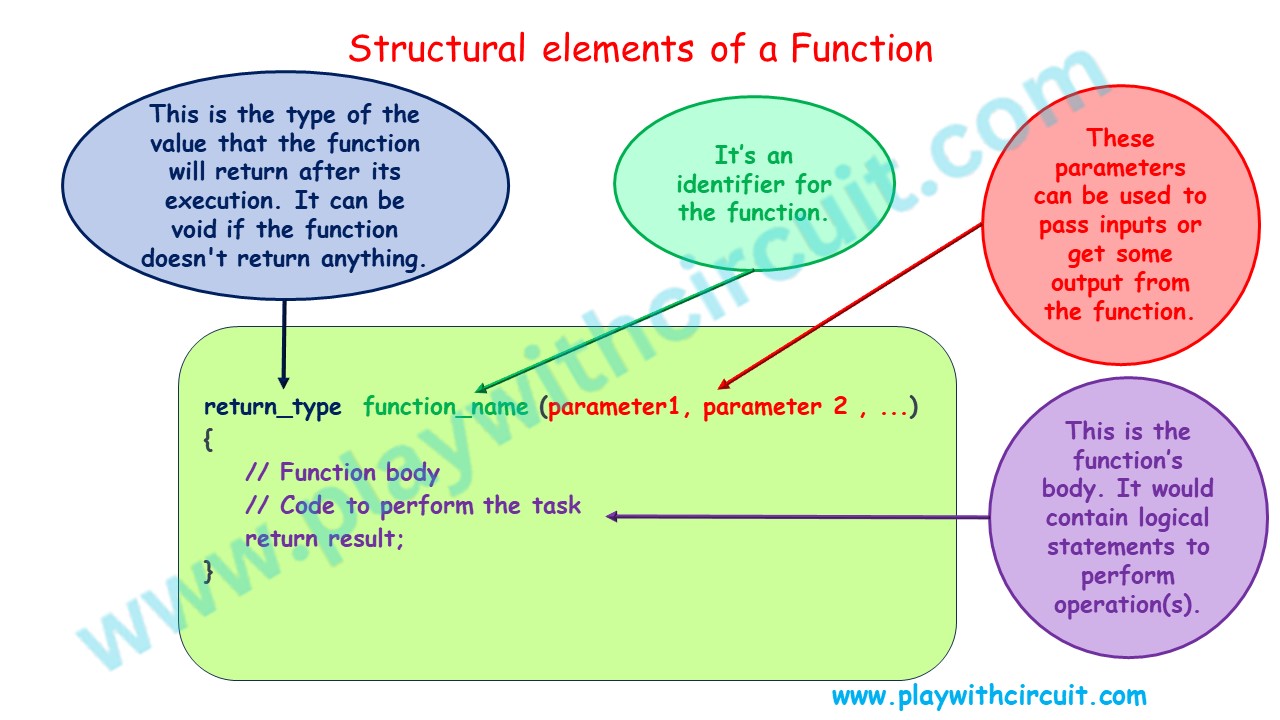
return_type: This is the type of the value that the function will return after its execution. It can be void if the function doesn’t return anything.
function_name: This is the name of the function, which should be unique within your program. When creating function names in Arduino programming, it’s important to follow some rules and best practices to ensure clarity and consistency in your code. Here are the rules for creating function names in Arduino:
- Choose function names that clearly indicate what the function does.
- Function names can contain letters (both uppercase and lowercase) and numbers.
- Function names must start with a letter (a-z or A-Z).
- Avoid using Arduino’s reserved words, such as pinMode, digitalRead, etc.
parameters: These are optional values that you can pass to the function for it to work with. Parameters act as input to the function.
Function body: The actual code that performs the task is enclosed within curly braces. This is where you write the instructions for what the function should do.
Functions Declaration
To declare a function in Arduino, you need to specify the function’s name, return type (if any), and any parameters it accepts. Here’s how you declare a function in Arduino:
return_type function_name(parameter_type parameter_name) {
    // Function body
    // Code to perform the task
}
Here’s an example of declaring a simple function in Arduino:
int addNumbers(int a, int b) {
  int result = a + b;
  return result;
}
In this example:
- int is the return type, indicating that the function will return an integer.
- addNumbers is the function name.
- int a and int b are the parameters with their data types.
- Inside the function, it calculates the sum of a and b and returns the result as an integer.
After declaring a function, you can call it from the loop() or other functions as needed to execute the code encapsulated within it.
Examples
Here are some simple examples of creating and using functions in Arduino:
Example 1: Function to Add Two Numbers
int add(int a, int b) {
  return a + b;
}

void setup() {
  Serial.begin(9600);
  int result = add(5, 3);
  Serial.println("Result: " + String(result));
}

void loop() {
  // Your main program logic here
}
Output:
Result: 8
Explanation:
In this example, the add(int a, int b) function takes two integer parameters, adds them, and returns the result. It’s called in the setup() function to add 5 and 3, and the result is printed to the serial monitor.
Example 2: Function to Calculate the Area of a Rectangle
int RectangleArea(int length, int width) {
  return length * width;
}

void setup() {
  Serial.begin(9600);
  int length = 7;
  int width = 5;
  int area = RectangleArea(length, width);
  Serial.print("The area of the rectangle is: ");
  Serial.println(area);
}

void loop() {
  // Your main program logic here
}
Output:
The area of the rectangle is: 35
Explanation:
In this example, the RectangleArea(int length, int width) function takes the length and width of a rectangle as parameters and returns the area. The setup() function uses this function to calculate and print the area of a 7×5 rectangle.
Example 3: Function to Convert Celsius to Fahrenheit
float celsiusToFahrenheit(float celsius) {
  return (celsius * 9.0 / 5.0) + 32.0;
}

void setup() {
  Serial.begin(9600);
  float temperatureCelsius = 25.0;
  float temperatureFahrenheit = celsiusToFahrenheit(temperatureCelsius);
  Serial.print("Temperature in Fahrenheit: ");
  Serial.println(temperatureFahrenheit);
}

void loop() {
  // Your main program logic here
}
Output:
Temperature in Fahrenheit: 77.00
Explanation:
In this example, the celsiusToFahrenheit(float celsius) function converts a temperature in Celsius to Fahrenheit. The setup() function uses this function to convert and print a temperature of 25°C in Fahrenheit.
Best Practices for Using Functions
When using functions in Arduino programming, consider the following best practices:
- Use descriptive function names to make your code more self-explanatory.
- Keep functions short and focused on a single task.
- Comment your code to explain the purpose and usage of each function.
- Use parameters to pass data into functions when necessary.
- Avoid global variables whenever possible and pass data as parameters instead.
In conclusion, one of the most important first steps in creating structured, effective, and flexible code for your project is understanding how to use functions in Arduino projects. Functions are an incredibly useful tool for streamlining your code, whether you’re writing intricate sensor interactions, basic mathematical computations, or hardware control. Now that you’ve started adding functions to your Arduino projects, you’ll see how they improve the flexibility and organization of your code and make your projects easier to work on.

