
Arrays are a fundamental concept in Arduino programming. They can be very helpful for organizing and handling data from different input devices and sensors. In this guide, we will provide a detailed explanation of how to utilize arrays in Arduino sketches.
What is Array?
An array is a data structure that allows you to store multiple data values or elements of the same data type (Integer, Floating-Point, Character, Boolean, etc.) in a single variable. We can also make arrays for user-defined datatypes like Structures.
Arrays are especially useful when we need to work with a large number of similar data items, such as sensor readings or temperature values, as it eliminates the need for declaring individual variables for each data point.
Structure of the Array
Let us consider an example:
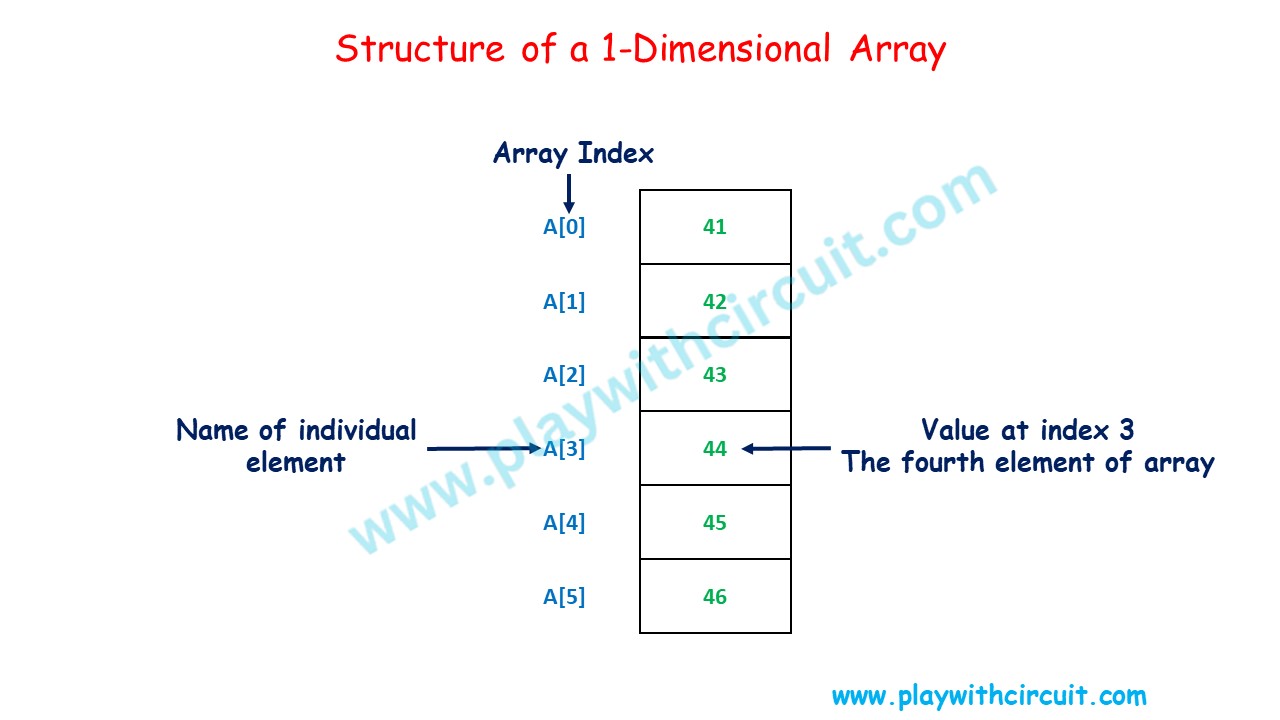
The above image shows an integer array called ‘A’ that contains six elements. We refer to these elements by the array name followed by the particular element’s position number in square brackets ([]) that is, A[0], A[1], A[2], A[3], A[4] and A[5]. The position number is called an index number and it always starts from the zero position and will end at one less than the number of elements in the array.
Declaring and Initializing Arrays
To declare an array in Arduino, you need to specify the data type of the elements in the array, give it a name (identifier), and specify the number of elements it can hold.
Syntax:
dataType arrayName[arraySize];- data_type: This is the data type of the elements that the array will hold. It can be int, float, char, or any other data type.
- array_name: This is the name you choose for your array to refer to the array in your code.
- array_size: This is the number of elements that the array can hold. It must be a positive integer. You can leave it empty if you want to dynamically allocate memory for the array later.
Here are some examples:
int myIntArray[5];          // Declares an integer array with 5 elements.
float sensorReadings[10];   // Declares a floating-point array with 10 elements.
char message[20];           // Declares a character array (string) having space for 20 characters.
Initializing an array in Arduino means providing initial values for the elements of the array when you declare it. You can do this using the following syntax:
data_type array_name[array_size] = {value1, value2, value3, ...};Here are some examples:
int Array[5] = {7, 8, 1, 9, 4};    // Initializes an integer array with values.
float sensorReadings[8] = {1.2, 3.4, 5.6, 7.8, 9.0, 11.1, 13.3, 15.5};    // Initializes a  floating point array with values.
You can also initialize arrays without explicitly specifying their size. You can leave the brackets empty and the size of the array will be determined automatically based on the number of elements provided in the initializer list.
Let’s see the code below:
char message[] = "Hello World";

void setup()
{
  Serial.begin(9600);
  Serial.print("Size of array is :");
  Serial.print(sizeof(message));
}

void loop()
{
}
Output:
Size of array is:12
Explanation:
The size of String “Hello World” is 11 characters including the space character but one space is also allotted for NULL character ‘\0’ placed automatically at the end of the string. Hence the size is shown as 12 characters.
In char arrays, the array size needs to be one greater than the number of characters. The extra element stores the null character. For example,
char array[8] = {"Arduino"};There are only 7 characters in “Arduino”, but the array size is 8 because we are defining the size then we have to make space for one NULL character ‘\0’ at the end of the string.
Examples Using Arrays
Example-1
Here we will create a sequence of LEDs that light up in a pattern using an array to control the LEDs:
int ledPins[6] = { 2, 3, 4, 5, 6, 7 };  // Array to store LED pin numbers
int delayTime = 500;                    // Delay between LED activations (in milliseconds)

void setup() {
  for (int i = 0; i < 6; i++) {
    pinMode(ledPins[i], OUTPUT);  // Set LED pins as output
  }
}

void loop() {
  for (int i = 0; i < 6; i++) {
    digitalWrite(ledPins[i], HIGH);  // Turn on the LED
    delay(delayTime);
    digitalWrite(ledPins[i], LOW);  // Turn off the LED
  }
}
Output:
Explanation:
int ledPins[6] = {2, 3, 4, 5, 6, 7};: This line declares an integer array called ledPins with a size of 6 and initializes it with the pin numbers (2, 3, 4, 5, 6, and 7) to which the LEDs are connected. These are the pins on the Arduino board that will be used to control the LEDs.
int delayTime = 500; // Delay between LED activations (in milliseconds)
This line declares an integer variable named delayTime and sets its value to 500. This variable represents the delay time in milliseconds between turning on and off each LED.
The setup() function is a standard Arduino function that is executed once when the Arduino is powered on or reset. In this function:
- for (int i = 0; i < 6; i++): This is a for loop that iterates from 0 to 5. It is used to configure each LED pin as an output. The pinMode() function is called for each pin in the ledPins array to set them as OUTPUT pins. This means these pins will be used to send signals to the LEDs.
The loop() function is another standard Arduino function that runs continuously after the setup() function is executed. In this function:
- for (int i = 0; i < 6; i++): This for loop is used to cycle through the 6 LEDs one by one.
- digitalWrite(ledPins[i], HIGH);: This line turns on the LED connected to the pin specified by ledPins[i]. It sets the pin’s voltage level to HIGH, which typically turns on an LED.
- delay(delayTime);: After turning on the LED, the program pauses for delayTime milliseconds. This creates a delay, causing the LED to remain on for that duration.
- digitalWrite(ledPins[i], LOW);: This line turns off the LED by setting the pin’s voltage level to LOW, which typically turns off an LED.
The loop() function repeats this process for each LED in the sequence, creating a pattern where each LED is turned on and off in sequence with a delay of delayTime milliseconds between each LED activation. This pattern will continue to repeat as long as the Arduino is powered ON.
Two-dimensional Array
So far, we have discussed one-dimensional arrays. Here we will explore a two-dimensional array. One-dimensional array only stores elements in a single row but a two-dimensional array allows you to store data in a grid or tabular form with rows and columns. It can be thought of as an array of arrays, where each element in the outer array contains an inner array.
Two-dimensional arrays can be used in LED Matrices and Displays, Sensors Grids, LCD and OLED Display etc.
The following figure illustrates a two-dimensional array, A. The array contains 6 rows and 4 columns, so it is a 6 * 4 array.
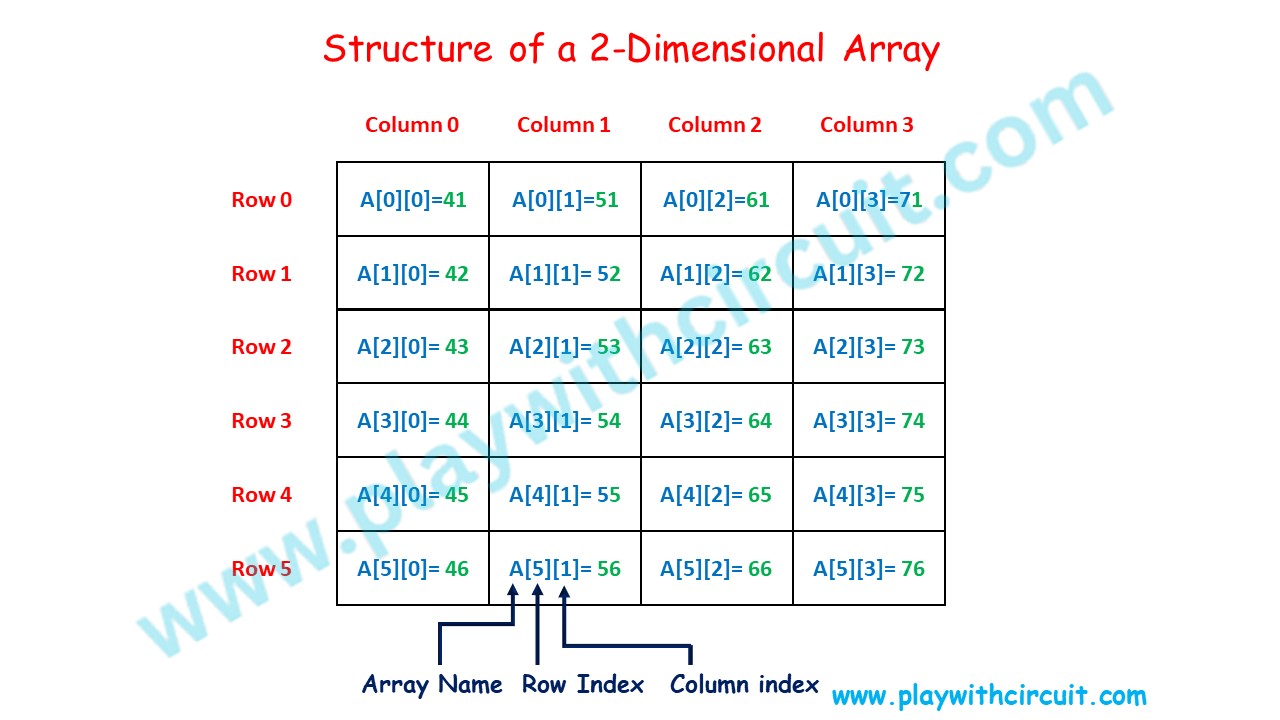
- Rows: These represent the horizontal dimension of the array. Each row is an array in itself, containing a set of elements. Rows are numbered from 0 to (number of rows – 1).
- Columns: These represent the vertical dimension of the array. Each column is a vertical slice that intersects with the rows. Columns are also numbered from 0 to (number of columns – 1).
- Elements: Each cell or intersection point of a row and a column contains an element, which can be of any data type, such as integers, floating-point numbers, characters, or even user-defined datatypes like structures.
Syntax:
data_type array_name[row_size][column_size];- data_type: This specifies the type of data that the array will hold, such as integers, floating-point numbers, or characters.
- array_name: This is the name you give to your two-dimensional array.
- row_size: The number of rows in the array.
- column_size: The number of columns in the array.
Declaring and Initialization:
If you want to declare a 2D array without initializing it with specific values, you can do so like this:
int myArray[3][4]; // Declares a 3x4 2D array of integers.In this example, we’ve declared a 3×4 array of integers named myArray. The array is initialized with default values (typically 0 for integers).
To initialize the array during declaration, you can specify the initial values using nested curly braces. Here’s an example:
int myMatrix[3][3] = {
  { 2, 3, 4 },
  { 6, 7, 8 },
  { 9, 10, 11 }
};
In this example, we’ve declared a 3×3 array of integers named myMatrix and initialized it with specific values. Each set of curly braces represents a row in the array, and the values inside the inner curly braces represent the elements of each row.
After declaring and initializing a 2D array, you can access its elements using two indices—one for the row and one for the column. For example, myMatrix[1][2] accesses the element in the second row and third column, which is 8 in this case.
Example 2:
Here’s an example of performing basic addition on 2×2 matrix in Arduino using 2-dimensional array:
// Define two 2x2 matrices
int matrixA[2][2] = {
  { 1, 2 },
  { 3, 4 }
};
int matrixB[2][2] = {
  { 5, 6 },
  { 7, 8 }
};

void printMatrix(int matrixarray[2][2]) {
  int i, j;
  for (i = 0; i < 2; i++) {
    for (j = 0; j < 2; j++) {
      Serial.print(matrixarray[i][j]);
      Serial.print("\t");
    }
    Serial.println(" ");
  }
  Serial.println(" ");
}

void setup() {
  Serial.begin(9600);

  // Display matrix A and matrix B
  Serial.println("Matrix A:");
  printMatrix(matrixA);

  Serial.println("Matrix B:");
  printMatrix(matrixB);

  // Perform matrix addition
  int resultAddition[2][2];
  for (int i = 0; i < 2; i++) {
    for (int j = 0; j < 2; j++) {
      resultAddition[i][j] = matrixA[i][j] + matrixB[i][j];
    }
  }

  // Display the result of matrix addition
  Serial.println("Matrix A + Matrix B:");
  printMatrix(resultAddition);
}

void loop() {
  // Your code here
}
Output:
Matrix A:
1 2
3 4
Matrix B:
5 6
7 8
Matrix A + Matrix B:
6 8
10 12
Explanation:
In the above example, we define two 2×2 matrices matrixA and matrixB. We perform matrix addition by iterating through the elements of the matrices and storing the results in separate matrices. The results are then displayed on the serial monitor.


