
In Arduino programming, loops are control structures that allow you to repeat a specific block of code multiple times. They allow you to control the flow of your code efficiently. Loops are very useful for performing tasks that need to be executed repeatedly, such as reading sensors, controlling actuators, or running algorithms.
In this article, we will discuss how to use for loop, while loop and do-while loop in Arduino IDE. We will explain the structure, provide an example, and include a flowchart to help you visualize the working of loops.
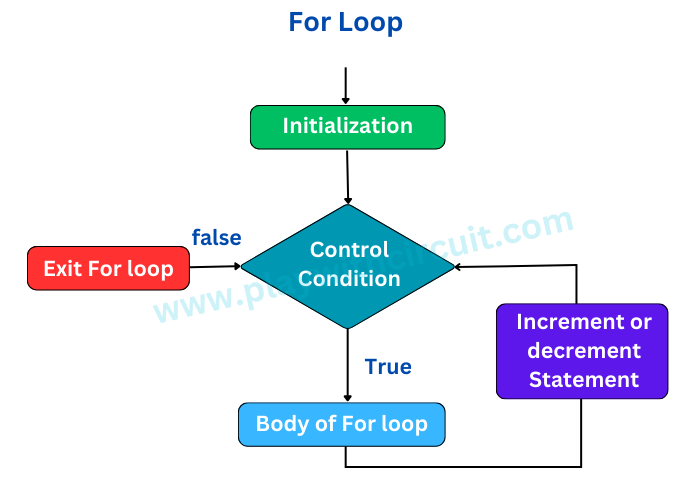
for (initialization; condition; increment/decrement) { // Code to be executed }- Initialization: This is where you set the initial conditions, typically defining a variable and initializing it to a certain value.
- Condition: The loop continues to run as long as the condition remains true. Once the condition becomes false, the loop terminates.
- Increment/Decrement: After each iteration, the loop variable is updated, either incremented or decremented.
You can use for loops anywhere inside the setup() and loop() functions, and within your own functions. You can even use for loops inside other for loops.
Below is the flow chart showing how a for loop works:
To illustrate the concept, let’s consider a simple example of blinking an LED using a for loop. Let’s assume you have an LED connected to pin 13 on your Arduino board. You want it to blink ten times with a half-second delay between each blink. Here’s how you can achieve this with a for loop:
int ledPin = 13;  // LED connected to digital pin 13

void setup() {
  pinMode(ledPin, OUTPUT);  // Set the LED pin as an output
    for (int i = 0; i < 5; i++) {
    digitalWrite(ledPin, HIGH);  // Turn the LED on
    delay(500);                  // Wait for 500 milliseconds
    digitalWrite(ledPin, LOW);   // Turn the LED off
    delay(500);                  // Wait for 500 milliseconds
  }
}

void loop() {

}- In this example:
- We initialize the LED pin in the setup() function.
- In the setup() function, we configure the ledPin as an OUTPUT pin using the pinMode() function. This step ensures that the digital pin 13 is set up to control an LED.
Now, let’s dive into the for loop within the setup() function:
- for (int i = 0; i <5; i++): This is the for loop declaration. It initializes an integer variable i to 0, and the loop will execute as long as i is less than 5. After each iteration, i is incremented by 1 (i++).
Inside the for loop:
- digitalWrite(ledPin, HIGH): This line turns the LED on by setting the ledPin to HIGH.
- delay(500): After turning the LED on, we introduce a delay of 500 milliseconds (half a second) using the delay() function.
- digitalWrite(ledPin, LOW): Here, we turn the LED off by setting the ledPin to LOW. This cuts off power to the LED.
- delay(500): After turning the LED off, another delay of 500 milliseconds is introduced.
This for loop effectively blinks the LED on and off five times with half-second intervals. Once the loop completes these five iterations, the loop() function is called and its program stays there forever.
While Loop
A while loop has the following syntax:
while (condition) {
// Code to be executed
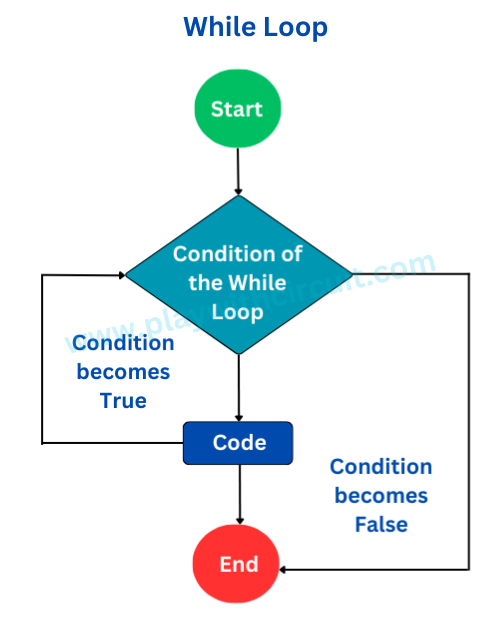
}Condition: It determines whether the loop should continue executing or terminate. As long as the condition evaluates to true, the code within the loop will keep running. If the condition becomes false at any point, the loop exits, and program control proceeds to the next statement after the loop.
Code Block: The block of code enclosed within the curly braces {} is what gets executed repeatedly as long as the condition remains true. This is where you put the instructions you want to repeat.
Here is the flowchart of while loop:
Here’s a basic example of how a while loop works in Arduino code:
int count = 0;

void setup() {
  Serial.begin(9600);
}

void loop() {
  while (count < 5) {  // This loop runs while 'count' is less than 5
    Serial.println("Count: " + String(count));
    count++;      // Increment 'count' on each iteration
    delay(1000);  // Delay for 1 second
  }
}
In this example, the while loop runs until the ‘count’ variable reaches 5, printing the count value to the serial monitor in each iteration.
Output
Count: 0
Count: 1
Count: 2
Count: 3
Count: 4
Let us consider another example to understand how a while loop can be used to monitor a sensor and take action based on a certain condition.
int sensorPin = A0;   // Analog pin for sensor input
int threshold = 250;  // Threshold value for sensor reading
int ledPin = 13;      // Digital pin for an LED

void setup() {
  pinMode(ledPin, OUTPUT);
  Serial.begin(9600);
}

void loop() {
  int sensorValue = analogRead(sensorPin);  // Read the sensor value

  while (sensorValue > threshold) {
    digitalWrite(ledPin, HIGH);  // Turn on the LED
    Serial.println("Sensor value above threshold: " + String(sensorValue));
    delay(500);                           // Delay for 0.5 seconds
    digitalWrite(ledPin, LOW);            // Turn off the LED
    delay(500);                           // Delay for 0.5 seconds
    sensorValue = analogRead(sensorPin);  // Read the sensor value again
  }

  Serial.println("Sensor value below threshold: " + String(sensorValue));
  delay(2000);
}
Output on Serial Monitor:
Sensor value above threshold: 267
Sensor value above threshold: 299
Sensor value below threshold: 220
Sensor value above threshold: 285
Sensor value below threshold: 198
Sensor value below threshold: 234
Sensor value above threshold: 296
Sensor value below threshold: 214
Sensor value above threshold: 292
Sensor value below threshold: 198
Sensor value above threshold: 308
In this example:
We read an analog sensor’s value from pin A0, set a threshold value of 400 and use an LED connected to digital pin 13.
The program continuously checks the sensor value. If the sensor value is above the threshold, it turns ON the LED, prints the sensor value to the serial monitor, blinks the LED for 0.5 seconds, and then reads the sensor value again. This process repeats until the sensor value falls below the threshold, at which point it prints the new sensor value to the serial monitor.
Do-While Loop
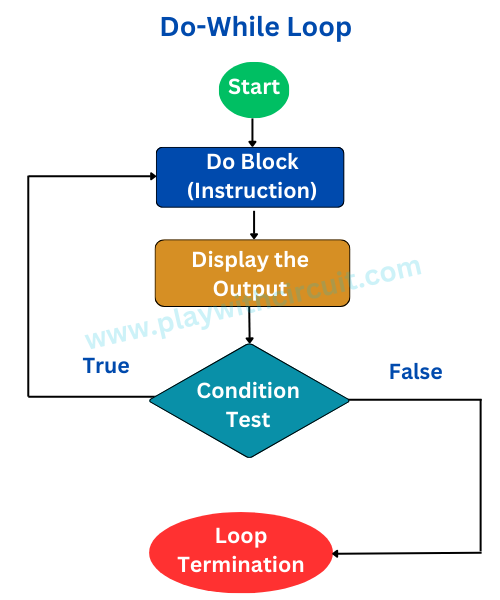
A do-while loop is similar to a while loop, but one key difference is that in a do-while loop, the code block is executed at least once before the loop’s condition is checked. Thus the code in the body will run at least once, even if the loop condition is initially true or false.
Here’s the general syntax of a do-while loop:
do {
    // Code to be executed
} while (condition);
The do-while loop has two blocks- do block and while block. The first block includes the instruction that is to be executed and in the second block there is the condition.
The loop starts with an initialization step that includes setting initial values for variables. Then the code block inside the loop is executed. After that the loop checks the specified condition. If the condition is true, the loop continues, and the code block is executed again. If the condition is false, the loop terminates, and the program continues with the next statement after the loop.
Here is the flow chart of the do-while loop that gives you better understanding of its working:
Here’s an example of LED blinking using do-while loop:
int ledPin = 13;  // Digital pin for the LED

void setup() {
  pinMode(ledPin, OUTPUT);
  Serial.begin(9600);
}

void loop() {
  int blinkCount = 0;  // Initialize a counter for the number of blinks

  do {
    digitalWrite(ledPin, HIGH);  // Turn on the LED
    delay(500);                  // Delay for 0.5 seconds (500 milliseconds)
    digitalWrite(ledPin, LOW);   // Turn off the LED
    delay(500);                  // Delay for another 0.5 seconds
    blinkCount++;                // Increment the blink counter
  } while (blinkCount < 5);      // Blink the LED 5 times

  Serial.println("LED blinked 5 times. Loop ended.");

  // Add a delay before starting the loop again
  delay(2000);  // Delay for 2 seconds before the next loop
}
In this example, LED is connected to digital pin 13.
Inside the loop() function, do-while loop does the following:
- It turns on the LED.
- It waits for 0.5 seconds (500 milliseconds).
- It turns off the LED.
- It waits for another 0.5 seconds.
- It increments the blinkCount variable by 1.
- It checks whether blinkCount is less than 5. If blinkCount is still less than 5, the loop continues, and the LED blinks again.
This loop continues until blinkCount becomes equal to or greater than 5, at which point the loop terminates. After the loop, it prints a message to the serial monitor, indicating that the LED has blinked 5 times.
There’s an additional delay of 2 seconds (2000 milliseconds) before the next loop starts.
Break Statement
The break statement is a control statement that is often used to exit a loop immediately or to terminate the execution of a switch statement. It is commonly used within loops (such as for and while loops) to exit the loop before its normal termination condition is met. This can be useful when you want to stop the loop’s execution based on a certain condition.
For example,
void setup() {
  Serial.begin(9600);
  for (int i = 0; i < 10; i++) {
    if (i == 5) {
      break;  // Exit the loop when i equals 5
    }
    Serial.println("Hello World");  // Code here will not be executed when i equals 5
  }
  Serial.println("Play with Circuit");
}

void loop() {

}
Output of code:
Hello World
Hello World
Hello World
Hello World
Play with Circuit
In this example, the loop runs from i equal to 0 up to 9. However, when i equals 5, the break statement is encountered, and the loop is terminated immediately. The code following the break statement is not executed, so “Hello World” will not be printed to the serial monitor. But since Serial.print(“Play with Circuit“); is outside of the for loop, “Play with Circuit” will be printed to the serial monitor.
Continue Statement
The continue statement is used within loops to skip the current iteration and move on to the next iteration. It can be useful when you want to skip specific iterations based on a condition while continuing the loop.
Here is an example of continue statement. In this program, we calculate and print the squares of numbers from 1 to 10, but we will skip the calculation and printing for even numbers using the continue statement:
void setup() {
  int square;
  Serial.begin(9600);
  for (int i = 1; i <= 10; i++) {
    // Check if i is an even number
    if (i % 2 == 0) {
      // Skip the current iteration when i is even
      continue;
    }
    // Calculate and print the square of the odd number
    square = i * i;
    Serial.print("Square of number ");
    Serial.print(i);
    Serial.print(" is ");
    Serial.println(square);
  }
}

void loop() {
}
Serial Output:
Square of number 1 is 1
Square of number 3 is 9
Square of number 5 is 25
Square of number 7 is 49
Square of number 9 is 81
In this example, in the setup() function, we use a for loop to iterate from 1 to 10. Inside the loop, we check if the current value of i is even by using the modulo operator (%). If i is evenly divisible by 2 (i % 2 == 0), it’s an even number, and we use the continue statement to skip the current iteration.
For odd numbers (when i is not even), we calculate the square of i and print it along with a message indicating which number’s square is being calculated.
This example demonstrates how the continue statement can be used to control the flow within a loop and skip specific iterations based on a condition.
In conclusion, loops are powerful tools used in Arduino to perform repetitive tasks and control the flow of your code. With the right understanding of the syntax and working of the loops, they can save time and resources.


