

Imagine you’re building a weather station that logs temperature and humidity every 10 seconds, or a smart irrigation system that stores soil moisture readings throughout the day. In such projects, Arduino’s built-in memory just isn’t enough to store all the data.
So, how do you expand its storage?
The answer is simple—a Micro SD card that you already use in your phones or cameras. These tiny cards can store megabytes or even gigabytes of data. By using a Micro SD card module, you can easily connect a microSD card to your Arduino and add powerful data storage capability to your next project.
In this tutorial, you’ll learn how to interface a microSD card module with Arduino. Let’s get started!
Micro SD Card Module Hardware Overview
The module includes three essential parts: the microSD card socket, the voltage regulator, and the logic level shifter.

Micro SD Card Socket This is the part where you insert the memory card. Most modules have clear indicators next to the socket that shows the correct way to insert the card.
3.3V LDO Voltage Regulator Another key component is the ultra-low dropout (LDO) voltage regulator built into the module. As a microSD card operates on 3.3V so if we connect 5V directly to the microSD card, it will get damaged. This regulator steps down the 5V power supplied by the Arduino or other external source to 3.3V. The regulator ensures that the card gets a steady 3.3V supply, even if the input voltage fluctuates slightly.
Logic Level Shifter The 74LVC125A logic level shifter chip acts like a voltage translator that converts the 5V signal from the Arduino to 3.3V signal before they reach the SD card. This ensures both devices can communicate without damaging the card.
Micro SD Card Module Pinout
The pinout of a Micro SD Card Module is given below:

GND This is the ground pin and it should be connected to the GND pin of the Arduino.
VCC This is the power supply pin that can be connected to the 5V pin on the Arduino.
MISO The MISO pin stands for Master In Slave Out. It is the SPI output pin of the Micro SD card module that sends data to Arduino.
MOSI The MOSI pin stands for Master Out Slave In. It is the SPI input pin of the Micro SD card module that receives data from Arduino.
SCK The SCK pin stands for Serial Clock. It receives clock signals from Arduino to synchronize data transmission.
CS The CS pin, also known as Chip Select or Slave Select (SS), is used to activate or deactivate the Micro SD card module on the SPI bus.
Interfacing a Micro SD Card Module with Arduino
Now that we have a complete understanding of a Micro SD card module, let’s learn how to interface it with Arduino uno along with I2C LCD to display information.
Hardware Requirement
| Component Name | Quantity | Remarks | Where to Buy |
|---|---|---|---|
| Arduino UNO R3 | 1 | Revision R3 | Amazon |
| LCD 16x2 | 1 | I2C support | Amazon |
| Jumper Wires | Multiple | For Arduino and LCD connections | Amazon |
| USB Cable Type A to B | 1 | for programming Arduino UNO | Amazon |
| 12V Supply Adapter | 1 | For providing power to Arduino | Amazon |
| Micro SD card Module | 1 | For interfacing with Arduino | Amazon |
| Micro SD card | 1 | For storing data | Amazon |
Software Requirement
- Arduino IDE, Version 2.3.4 or above installed on your PC.
- LiquidCrystal_I2C Library by Frank de Brabander V 1.1.2
- SD card library installed automatically with Arduino.
Steps to install LCD library in Arduino IDE
- First open Arduino IDE .
- Then go to Library Manager and search “LiquidCrystal I2C Frank de Brabander”.
- Now Install “LiquidCrystal I2C” library.

Commonly Used Functions of SD Card Library related to File Class
SD.begin() This function initializes the SD card. It returns true if the card was successfully initialized, otherwise false.
SD.exists(filename) This function checks if a file or directory exists on the SD card. It returns true if it exists, otherwise false.
SD.remove(filename) This function deletes the specified file from the SD card. It returns true if the file is successfully deleted, otherwise false.
SD.mkdir(NewDirectory) This function creates a directory (folder) with the given path. It returns true on success.
SD.rmdir(path) This function removes a directory. It returns true if deletion is successful.
SD.open(path, mode) This function opens a file for reading or writing. The mode can be FILE_READ or FILE_WRITE. It returns a File object that can be used for further operations.
File.read() This function reads the next byte from the file. It returns the byte as an int or -1 if no data is available.
File.write(data) This function writes a byte or byte array to the file. It returns the number of bytes written.
File.available() This function returns the number of bytes available to read from the file. It is useful in loops to check if data is left to read.
File.flush() This function writes any buffered data to the SD card. It is used to make sure all data is saved before closing the file.
File.close() This function closes the file to ensure all data is written and resources are freed. Always call this after writing or reading.
File.seek(position) This function moves the file pointer to a specific byte in the file. Useful for overwriting or skipping parts of the file.
Wiring Connections

The SD card module works over SPI hence it uses SPI peripheral pins like MOSI, MISO, CS pins for communication. It can be done using SDIO (Secure Digital Input Output) but it is not covered under the scope of this article.
Wiring involves two more connections VCC(5V) and GND to provide power to the module.
The connection between Arduino Uno and card reader is as follows:
| SD Card Reader | Arduino Side Pin |
|---|---|
| CS (Pin 1) | 10 |
| SCK (pin 2) | 13 |
| MOSI (Pin 3) | 11 |
| MISO(Pin 4) | 12 |
| VCC (pin 5) | 5 V pin of Arduino |
| GND (Pin 6) | GND pin of Arduino |
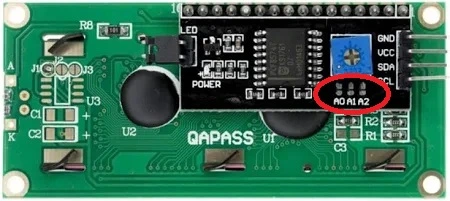
The wiring of I2C LCD with Arduino is simple. Connect the Vcc and GND pin of I2C LCD with Vcc and GND pin of Arduino. SCL(clock) and SDA(data) pins of I2C LCD are connected to SCL and SDA pins of Arduino. SCL and SDA pins are the same as pins A5 and A4 Analog input pins of Arduino where pink and blue wires are connected with LCD. These header pins are also connected to A5 and A4 pins of Arduino.
Make sure A0, A1, A2 address jumpers are not shorted when using I2C LCD. As in code we will be using Address 0x27 for the I2C LCD which will only be formed when these jumpers are not shorted in the I2C LCD.
Arduino Code for checking Micro SD card Information
In this code the information about SD card is displayed on I2C LCD as well as sent on serial terminal at baud 9600,n,8,1.
/*
Code to get info about SD card and for testing if its working or not
by platwithcircuit.com
*/
#include <SPI.h>
  // include SPI library header
#include <SD.h>
  // include the SD library header
#include <LiquidCrystal_I2C.h>
  // include I2C LCD library header

// set up variables using the SD utility library functions
Sd2Card card;
SdVolume volume;
SdFile root;

// Set the LCD address to 0x27 for a 16 chars and 2 line display
LiquidCrystal_I2C lcd(0x27, 16, 2);
const int chipSelect = 10;

void setup() {
  // initialize the LCD
  lcd.init();
  // Turn ON the Backlight
  lcd.backlight();
  // Clear the display buffer
  lcd.clear();

  // Print a message to the LCD
  lcd.setCursor(0, 0);
  lcd.print("Initializing");
  lcd.setCursor(0, 1);
  lcd.print("SD Card...");

  // Open serial communications and wait for port to open
  Serial.begin(9600);
  while (!Serial) {
    ;  // wait for serial port to connect
  }

  Serial.print("\nInitializing SD card...");
  delay(1000);
  // we'll use the initialization code from the utility libraries
  // since we're just testing if the card is working!
  if (!card.init(SPI_HALF_SPEED, chipSelect)) {
    Serial.println("initialization failed. Things to check:");
    Serial.println("* is a card inserted?");
    Serial.println("* is your wiring correct?");
    Serial.println("* did you change the chipSelect pin to match your shield or module?");
    lcd.clear();
    lcd.setCursor(0, 0);
    lcd.print("Initialization");
    lcd.setCursor(0, 1);
    lcd.print("Failed");
    while (1)
      ;
  } else {
    Serial.println("Wiring is correct and a card is present.");
    lcd.clear();
    lcd.setCursor(0, 0);
    lcd.print("Initialization");
    lcd.setCursor(0, 1);
    lcd.print("Successfull");
    delay(2000);
  }

  // print the type of card
  Serial.println();
  Serial.print("Card type:         ");
  lcd.clear();
  lcd.setCursor(0, 0);
  lcd.print("Card Type:");
  lcd.setCursor(0, 1);
  switch (card.type()) {
    case SD_CARD_TYPE_SD1:
      Serial.println("SD1");
      lcd.print("SD1");
      break;
    case SD_CARD_TYPE_SD2:
      Serial.println("SD2");
      lcd.print("SD2");
      break;
    case SD_CARD_TYPE_SDHC:
      Serial.println("SDHC");
      lcd.print("SDHC");
      break;
    default:
      Serial.println("Unknown");
      lcd.print("Unknown");
  }
  delay(2000);

  // Now we will try to open the 'volume'/'partition' - it should be FAT16 or FAT32
  if (!volume.init(card)) {
    Serial.println("Could not find FAT16/FAT32 partition.\nMake sure you've formatted the card");
    while (1)
      ;
  }

  Serial.print("Clusters:          ");
  Serial.println(volume.clusterCount());

  lcd.clear();
  lcd.setCursor(0, 0);
  lcd.print("Clusters:");
  lcd.setCursor(0, 1);
  lcd.print(volume.clusterCount());
  delay(2000);

  Serial.print("Blocks per Cluster:  ");
  Serial.println(volume.blocksPerCluster());

  lcd.clear();
  lcd.setCursor(0, 0);
  lcd.print("Block per Clster");
  lcd.setCursor(0, 1);
  lcd.print(volume.blocksPerCluster());
  delay(2000);

  Serial.print("Total Blocks:      ");
  Serial.println(volume.blocksPerCluster() * volume.clusterCount());
  Serial.println();

  lcd.clear();
  lcd.setCursor(0, 0);
  lcd.print("Total Blocks:");
  lcd.setCursor(0, 1);
  lcd.print(volume.blocksPerCluster() * volume.clusterCount());
  delay(2000);

  // print the type and size of the first FAT-type volume
  uint32_t volumesize;
  Serial.print("Volume type is:    FAT");
  Serial.println(volume.fatType(), DEC);

  lcd.clear();
  lcd.setCursor(0, 0);
  lcd.print("Volume type is:");
  lcd.setCursor(0, 1);
  lcd.print("FAT");
  lcd.print(volume.fatType(), DEC);
  delay(2000);

  volumesize = volume.blocksPerCluster();  // clusters are collections of blocks
  volumesize *= volume.clusterCount();     // we'll have a lot of clusters
  volumesize /= 2;                         // SD card blocks are always 512 bytes (2 blocks are 1KB)

  Serial.print("Volume size (KB):  ");
  Serial.println(volumesize);

  lcd.clear();
  lcd.setCursor(0, 0);
  lcd.print("Volume size (KB):");
  lcd.setCursor(0, 1);
  lcd.print(volumesize);
  delay(2000);

  Serial.print("Volume size (MB):  ");
  volumesize /= 1024;
  Serial.println(volumesize);

  lcd.clear();
  lcd.setCursor(0, 0);
  lcd.print("Volume size (MB):");
  lcd.setCursor(0, 1);
  lcd.print(volumesize);
  delay(2000);

  Serial.print("Volume size (GB):  ");
  Serial.println((float)volumesize / 1024.0);

  lcd.clear();
  lcd.setCursor(0, 0);
  lcd.print("Volume size (GB):");
  lcd.setCursor(0, 1);
  lcd.print((float)volumesize / 1024.0);
  delay(2000);

  Serial.println("\nFiles found on the card (name, date and size in bytes): ");
  root.openRoot(volume);

  // list all files in the card with date and size
  root.ls(LS_R | LS_DATE | LS_SIZE);
}

void loop(void) {
}
Output
Code Explanation
The code starts by including three essential libraries:
SPI.hRequired for SPI communication between Arduino and SD card module.SD.hEnables interaction with the SD card filesystem (like reading, writing, formatting, etc.).LiquidCrystal_I2C.hUsed to control an I2C 16×2 LCD module to display SD card info.
#include <SPI.h>
  // include SPI library header
#include <SD.h>
  // include the SD library header
#include <LiquidCrystal_I2C.h>
  // include I2C LCD library header
Now we declare following objects from the SD library to access lower-level SD card information:
Sd2CardHandles raw access to the SD card.SdVolumeManages the filesystem partition on the card (FAT16/FAT32).SdFile rootRepresents the root directory of the SD card.
// set up variables using the SD utility library functions:
Sd2Card card;
SdVolume volume;
SdFile root;
Next, we initialize a 16×2 I2C LCD at address 0x27. Then we define chipSelect as pin 10, which is typically used for SD modules in SPI communication.
// Set the LCD address to 0x27 for a 16 chars and 2 line display
LiquidCrystal_I2C lcd(0x27, 16, 2);
const int chipSelect = 10;
In the setup function, first we initialize the LCD, then we turn on the LCD backlight and clear any previous content on the screen.
Next we set the cursor to top-left (0, 0) and print “Initializing”. Then the cursor moves to the second row (0, 1) and prints “SD Card…” this shows the user that the initialization has started.
void setup() {

  // initialize the LCD
  lcd.init();
  // Turn ON the Backlight
  lcd.backlight();
  // Clear the display buffer
  lcd.clear();

  // Print a message to the LCD
  lcd.setCursor(0, 0);
  lcd.print("Initializing");
  lcd.setCursor(0, 1);
  lcd.print("SD Card...");
Next we initialize serial communication at 9600 baud rate. The while loop ensures the serial monitor is read.
Next, a message is sent to the Serial Monitor that SD card initialization is starting. We use delay(1000) to pause for 1 second to allow the user to read the message.
card.init() function initializes the SD card using SPI at half speed. Lower speed improves reliability with low-quality SD cards or wiring. If initialization fails, it goes into the error handling block.
// Open serial communications and wait for port to open
  Serial.begin(9600);
  while (!Serial) {
    ;  // wait for serial port to connect
  }

  Serial.print("\nInitializing SD card...");
  delay(1000);
  // we'll use the initialization code from the utility libraries
  // since we're just testing if the card is working!
  if (!card.init(SPI_HALF_SPEED, chipSelect)) {
If initialization fails, helpful troubleshooting tips are printed. Then the LCD is cleared and displays “Initialization Failed”.
The sketch halts using while(1) to prevent further execution since the card isn’t accessible.
 Serial.println("initialization failed. Things to check:");
    Serial.println("* is a card inserted?");
    Serial.println("* is your wiring correct?");
    Serial.println("* did you change the chipSelect pin to match your shield or module?");
    lcd.clear();
    lcd.setCursor(0, 0);
    lcd.print("Initialization");
    lcd.setCursor(0, 1);
    lcd.print("Failed");
    while (1)
      ;
If initialization is successful, a success message is printed on both LCD and Serial.
Then a pause of 2 seconds is added so the user can read the success message.
} else {
    Serial.println("Wiring is correct and a card is present.");
    lcd.clear();
    lcd.setCursor(0, 0);
    lcd.print("Initialization");
    lcd.setCursor(0, 1);
    lcd.print("Successfull");
    delay(2000);
  }
Then we prepare both the LCD and Serial monitor for displaying card type.
// print the type of card
  Serial.println();
  Serial.print("Card type:         ");
  lcd.clear();
  lcd.setCursor(0, 0);
  lcd.print("Card Type:");
  lcd.setCursor(0, 1);
card.type() function detects card format:
- SD1 = old SDSC card
- SD2 = newer SDSC
- SDHC = high capacity (above 2GB)
- Unknown = unrecognized
Then the result is shown on both the Serial monitor and LCD, then sketch waits for 2 seconds.
switch (card.type()) {
    case SD_CARD_TYPE_SD1:
      Serial.println("SD1");
      lcd.print("SD1");
      break;
    case SD_CARD_TYPE_SD2:
      Serial.println("SD2");
      lcd.print("SD2");
      break;
    case SD_CARD_TYPE_SDHC:
      Serial.println("SDHC");
      lcd.print("SDHC");
      break;
    default:
      Serial.println("Unknown");
      lcd.print("Unknown");
  }
  delay(2000);
Next, volume.init(card) tries to find a valid FAT16 or FAT32 file system. If not found, it prints an error and stops the program.
// Now we will try to open the 'volume'/'partition' - it should be FAT16 or FAT32
  if (!volume.init(card)) {
    Serial.println("Could not find FAT16/FAT32 partition.\nMake sure you've formatted the card");
    while (1)
      ;
  }
Next, the code retrieves and displays the total number of clusters. A cluster is a logical grouping of data blocks on the SD card.
Serial.print("Clusters:          ");
Serial.println(volume.clusterCount());

  lcd.clear();
  lcd.setCursor(0, 0);
  lcd.print("Clusters:");
  lcd.setCursor(0, 1);
  lcd.print(volume.clusterCount());
  delay(2000);
The code displays the number of blocks per cluster on Serial Monitor and LCD.
Serial.print("Blocks per Cluster:  ");
Serial.println(volume.blocksPerCluster());

  lcd.clear();
  lcd.setCursor(0, 0);
  lcd.print("Block per Clster");
  lcd.setCursor(0, 1);
 lcd.print(volume.blocksPerCluster());
 delay(2000);
The code calculates the SD card’s raw capacity in 512‑byte blocks by multiplying the number of blocks in each cluster with the total cluster count. It first prints a label and the resulting value to the Serial Monitor, then inserts a blank line for readability. Next, it clears the I2C LCD, writes the same “Total Blocks:” label on the top row, shows the computed block count on the second row, and pauses for two seconds so the user can read the display.
  Serial.print("Total Blocks:      ");
  Serial.println(volume.blocksPerCluster() * volume.clusterCount());
  Serial.println();

  lcd.clear();
  lcd.setCursor(0, 0);
  lcd.print("Total Blocks:");
  lcd.setCursor(0, 1);
  lcd.print(volume.blocksPerCluster() * volume.clusterCount());
  delay(2000);
First we declare a variable volumesize of type uint32_t (unsigned 32-bit integer). The code then identifies the FAT file system type (like FAT16 or FAT32) of the SD card using volume.fatType(). It then displays this information on both the Serial Monitor and the I²C LCD. The LCD first clears, prints “Volume type is:” on the first line, and then shows “FAT16” or “FAT32” on the second line. A 2-second delay is added.
 // print the type and size of the first FAT-type volume
  uint32_t volumesize;
  Serial.print("Volume type is:    FAT");
  Serial.println(volume.fatType(), DEC);

  lcd.clear();
  lcd.setCursor(0, 0);
  lcd.print("Volume type is:");
  lcd.setCursor(0, 1);
  lcd.print("FAT");
  lcd.print(volume.fatType(), DEC);
  delay(2000);
The code calculates the total size of the SD card in kilobytes (KB). It starts by getting the number of blocks in each cluster using volume.blocksPerCluster() and assigns it to volumesize. Then it multiplies that by the total number of clusters using volume.clusterCount(), giving the total number of 512-byte blocks. Since 2 blocks make 1 KB (because 512 bytes × 2 = 1024 bytes), it divides the result by 2 to convert the block count into kilobytes. This gives a more readable size metric for display.
volumesize = volume.blocksPerCluster();  // clusters are collections of blocks
volumesize *= volume.clusterCount();     // we'll have a lot of clusters
volumesize /= 2;                         // SD card blocks are always 512 bytes (2 blocks are 1KB)
The following code section displays the calculated volume size of the SD card in kilobytes (KB). First, it prints the label “Volume size (KB):” followed by the actual volumesize value to the Serial Monitor. Then, it clears the LCD screen and prints the same label on the first line of the display. On the second line, it prints the volumesize value, giving a clear and readable size of the SD card in KB.
  Serial.print("Volume size (KB):  ");
  Serial.println(volumesize);

  lcd.clear();
  lcd.setCursor(0, 0);
  lcd.print("Volume size (KB):");
  lcd.setCursor(0, 1);
  lcd.print(volumesize);
  delay(2000);
The following code block converts the SD card size from kilobytes to megabytes by dividing volumesize by 1024, then displays it on both the Serial Monitor and the LCD screen with a 2-second delay.
  Serial.print("Volume size (MB):  ");
  volumesize /= 1024;
  Serial.println(volumesize);

  lcd.clear();
  lcd.setCursor(0, 0);
  lcd.print("Volume size (MB):");
  lcd.setCursor(0, 1);
  lcd.print(volumesize);
  delay(2000);
Finally, the code converts the volume size to GB using float division and displays it on the LCD and Serial Monitor.
  Serial.print("Volume size (GB):  ");
  Serial.println((float)volumesize / 1024.0);

  lcd.clear();
  lcd.setCursor(0, 0);
  lcd.print("Volume size (GB):");
  lcd.setCursor(0, 1);
  lcd.print((float)volumesize / 1024.0);
  delay(2000);
The following code opens the root directory of the SD card and lists all files along with their names, last modified dates, and sizes in bytes on the Serial Monitor using root.ls() with flags LS_R, LS_DATE, and LS_SIZE.
Serial.println("\nFiles found on the card (name, date and size in bytes): ");
  root.openRoot(volume);

  // list all files in the card with date and size
  root.ls(LS_R | LS_DATE | LS_SIZE);
}

The loop() function is empty since all operations are performed once in the setup() function.

void loop(void) {
}
Code to Read-Write Data on Micro SD Card
/* Code to read and Write data on SD card using library functions
by playwithcircuit.com */

#include "string.h"
#include <SPI.h>
#include <SD.h>
#include <LiquidCrystal_I2C.h>  // I2C LCD

// create an object called datafile
File datafile;

char const dataArray[10] = "0123456789";
char cArray[11] = { 0 };
char index = 0;

// Set the LCD address to 0x27 for a 16 chars and 2 line display
LiquidCrystal_I2C lcd(0x27, 16, 2);
// Define Chip Select or slave select (CS/SS) pin used by library
const int chipSelect = 10;

void setup() {
  // initialize the LCD
  lcd.init();
  // Turn ON the Backlight
  lcd.backlight();
  // Clear the display buffer
  lcd.clear();

  // Print a message to the LCD
  lcd.setCursor(0, 0);
  lcd.print("Initializing");
  lcd.setCursor(0, 1);
  lcd.print("SD Card...");
  delay(2000);
  if (!SD.begin()) {
    lcd.clear();
    lcd.setCursor(0, 0);
    lcd.print("Initialization");
    lcd.setCursor(0, 1);
    lcd.print("Failed");
    while (1)
      return;
  }
  lcd.clear();
  lcd.setCursor(0, 0);
  lcd.print("Initialization");
  lcd.setCursor(0, 1);
  lcd.print("Successfull");
  delay(2000);

  // if the file already exist
  if (SD.exists("myData.txt")) {
    // remove that file
    SD.remove("myData.txt");
  }

  // Creation and opening a file in write mode
  datafile = SD.open("myData.txt", FILE_WRITE);

  // if the file opened okay, write to it:
  if (datafile) {
    datafile.print(dataArray);
    // close the file
    datafile.close();
    lcd.clear();
    lcd.setCursor(0, 0);
    lcd.print("Data Written");
    lcd.setCursor(0, 1);
    lcd.print("Successfully");
    delay(2000);
  } else {
    // if the file didn't open/create, print an error
    lcd.clear();
    lcd.setCursor(0, 0);
    lcd.print("File Creation");
    lcd.setCursor(0, 1);
    lcd.print("Failure");
    while (1)
      ;
  }

  // re-open the file for reading:
  datafile = SD.open("myData.txt");
  if (datafile) {
    lcd.clear();
    lcd.setCursor(0, 0);
    lcd.print("Data Read :");
    lcd.setCursor(0, 1);
    // read from the file until there's nothing else in it:
    while (datafile.available()) {
      cArray[index++] = datafile.read();
      if (index >= 10)
        break;
    }
    lcd.print(cArray);
    // close the file
    datafile.close();
    delay(3000);
    if (!(memcmp(dataArray, cArray, sizeof(dataArray)))) {
      lcd.clear();
      lcd.setCursor(0, 0);
      lcd.print("Data");
      lcd.setCursor(0, 1);
      lcd.print("Matches");
      while (1)
        ;
    } else {
      lcd.clear();
      lcd.setCursor(0, 0);
      lcd.print("Data");
      lcd.setCursor(0, 1);
      lcd.print("Doesn't Match");
      while (1)
        ;
    }
  } else {
    // if the file didn't open, print an error
    lcd.clear();
    lcd.setCursor(0, 0);
    lcd.print("File Opening");
    lcd.setCursor(0, 1);
    lcd.print("Failure");
    while (1)
      ;
  }
}

void loop() {
  // nothing happens after setup
}
Output
Code Explanation
The code begins by including all the necessary libraries:
-
string.h is included for string manipulation functions like memcmp().
-
SPI.h enables communication with the SD card using the SPI protocol.
-
SD.h handles file creation, reading, and writing on the SD card.
-
LiquidCrystal_I2C.h allows the Arduino to control an I2C-based LCD display
#include "string.h"
#include <SPI.h>
#include <SD.h>
#include <LiquidCrystal_I2C.h>
  // Include I2C LCD library
Now create a file object named datafile to interact with files on the SD card. Then define dataArray that holds the string data that we’ll write to the SD card. We use an empty character array cArray to store the data read back. index is used to keep track of the position while reading characters.
// create an object called datafile
File datafile;

char const dataArray[10] = "0123456789";
char cArray[11] = { 0 };
char index = 0;
Next we set up the LCD with I2C address 0x27, and configured it for 16 characters and 2 lines. chipSelect is the SS (Slave Select) pin used by the SD card module.
// Set the LCD address to 0x27 for a 16 chars and 2 line display
LiquidCrystal_I2C lcd(0x27, 16, 2);
// Define Chip Select or slave select (CS/SS) pin used by library
const int chipSelect = 10;
In the setup function, we initialize and light up the LCD, then show an “Initializing SD Card” message.
 void setup() {
  // initialize the LCD
  lcd.init();
  // Turn ON the Backlight
  lcd.backlight();
  // Clear the display buffer
  lcd.clear();

  // Print a message to the LCD
  lcd.setCursor(0, 0);
  lcd.print("Initializing");
  lcd.setCursor(0, 1);
  lcd.print("SD Card...");
  delay(2000);
Now, the code tries to initialize the SD card using SD.begin(). If it fails, it shows an error on the LCD and halts the program using an infinite loop. If the SD card initializes successfully, a confirmation message is shown on the LCD.
 if (!SD.begin()) {
    lcd.clear();
    lcd.setCursor(0, 0);
    lcd.print("Initialization");
    lcd.setCursor(0, 1);
    lcd.print("Failed");
    while (1)
      return;
  }
  lcd.clear();
  lcd.setCursor(0, 0);
  lcd.print("Initialization");
  lcd.setCursor(0, 1);
  lcd.print("Successfull");
  delay(2000);
Now the code checks if a file named “myData.txt” already exists. If it does, it deletes the file using SD.remove() to start fresh. This opens (or creates) the file in write mode. FILE_WRITE allows writing data at the end of the file.
// if the file already exist
  if (SD.exists("myData.txt")) {
    // remove that file
    SD.remove("myData.txt");
  }

  // Creation and opening a file in write mode
  datafile = SD.open("myData.txt", FILE_WRITE);
If the file is successfully opened, dataArray is written to it. After writing, the file is closed using datafile.close(), and a success message is shown on the LCD.
// if the file already exist
  if (SD.exists("myData.txt")) {
    // remove that file
    SD.remove("myData.txt");
  }

  // Creation and opening a file in write mode
  datafile = SD.open("myData.txt", FILE_WRITE);
If file creation/opening fails, an error message is shown and the program halts.
 } else {
    // if the file didn't open/create, print an error
    lcd.clear();
    lcd.setCursor(0, 0);
    lcd.print("File Creation");
    lcd.setCursor(0, 1);
    lcd.print("Failure");
    while (1)
      ;
  }
The datafile is reopened in read mode. If successful, the LCD is cleared and “Data Read” is displayed.
 // re-open the file for reading:
  datafile = SD.open("myData.txt");
  if (datafile) {
    lcd.clear();
    lcd.setCursor(0, 0);
    lcd.print("Data Read :");
    lcd.setCursor(0, 1);
A loop reads each character from the file one by one using datafile.read(). These characters are stored in cArray until 10 characters are read. The file is then closed and the read data is shown on the LCD for 3 seconds.
// read from the file until there's nothing else in it:
    while (datafile.available()) {
      cArray[index++] = datafile.read();
      if (index >= 10)
        break;
    }
    lcd.print(cArray);
    // close the file
    datafile.close();
    delay(3000);
The code compares the original dataArray with the read cArray using memcmp(). If they match, it displays “Data Matches” on the LCD and stops further execution.
if (!(memcmp(dataArray, cArray, sizeof(dataArray)))) {
      lcd.clear();
      lcd.setCursor(0, 0);
      lcd.print("Data");
      lcd.setCursor(0, 1);
      lcd.print("Matches");
      while (1)
        ;
If the data doesn’t match, an error message is displayed: “Data Doesn’t Match”, and the program halts.
} else {
      lcd.clear();
      lcd.setCursor(0, 0);
      lcd.print("Data");
      lcd.setCursor(0, 1);
      lcd.print("Doesn't Match");
      while (1)
        ;
    }
If the file isn’t successfully opened, it clears the LCD screen, displays “File Opening” on the first line and “Failure” on the second line. The while(1); statement then stops the program execution permanently.
} else {
    // if the file didn't open, print an error
    lcd.clear();
    lcd.setCursor(0, 0);
    lcd.print("File Opening");
    lcd.setCursor(0, 1);
    lcd.print("Failure");
    while (1)
      ;
  }
}

void loop() {
  // nothing happens after setup
}

