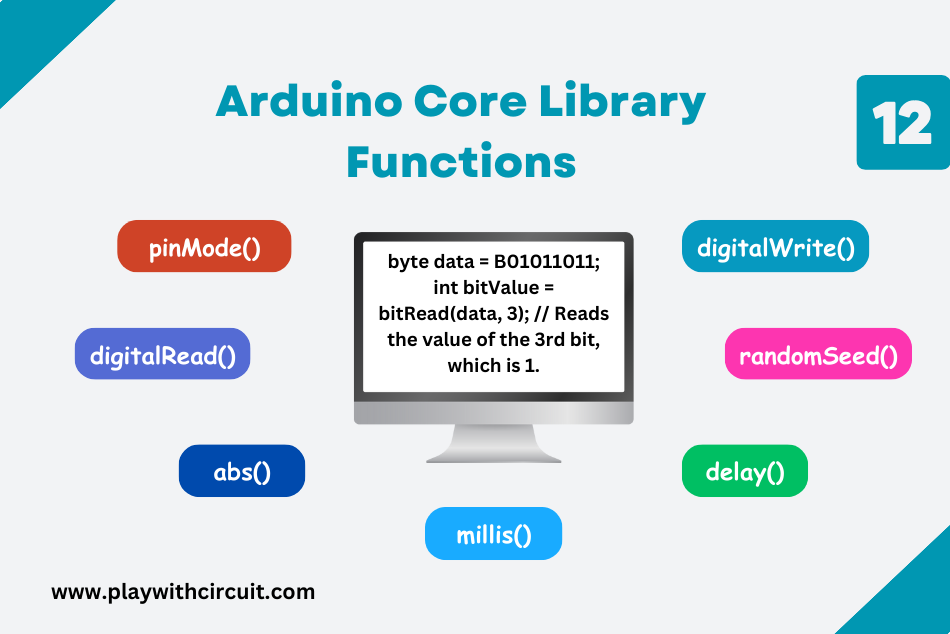
Arduino programming comes with a wide range of pre-built functions that are part of the Arduino core library. These functions are essential for interacting with hardware components, sensors, and various aspects of microcontroller programming. Here are some of the commonly used pre-built functions in Arduino.
Digital Input/Output Functions
pinMode() Function
- Used to configure a specific pin as either an INPUT or an OUTPUT.
- Essential for setting up digital pins for reading sensors or controlling external devices.
Syntax: pinMode(pin, mode);
Parameters:
pin Arduino pin number.
mode Mode can be INPUT, OUTPUT or INPUT_PULLUP.
Returns: void i.e., Nothing
digitalWrite() Function
- Used to write a digital HIGH or LOW value to a specified pin.
- It controls digital output devices like LEDs, relays, or digital actuators.
- When the pin is configured as input this function is used to enable/disable internal pullup resistors.
Syntax: digitalWrite(pin, value);
Parameters:
pin Arduino pin number.
value Value can be HIGH/LOW.
Returns: void i.e., Nothing
digitalRead() Function
- Reads the digital value (HIGH or LOW) from a specified digital pin.
- Used to read digital sensors or switches.
Syntax: value = digitalRead(pin);
Parameters:
pin Arduino pin number to be read
Returns: It can be HIGH or LOW.
Example of Digital I/O Functions
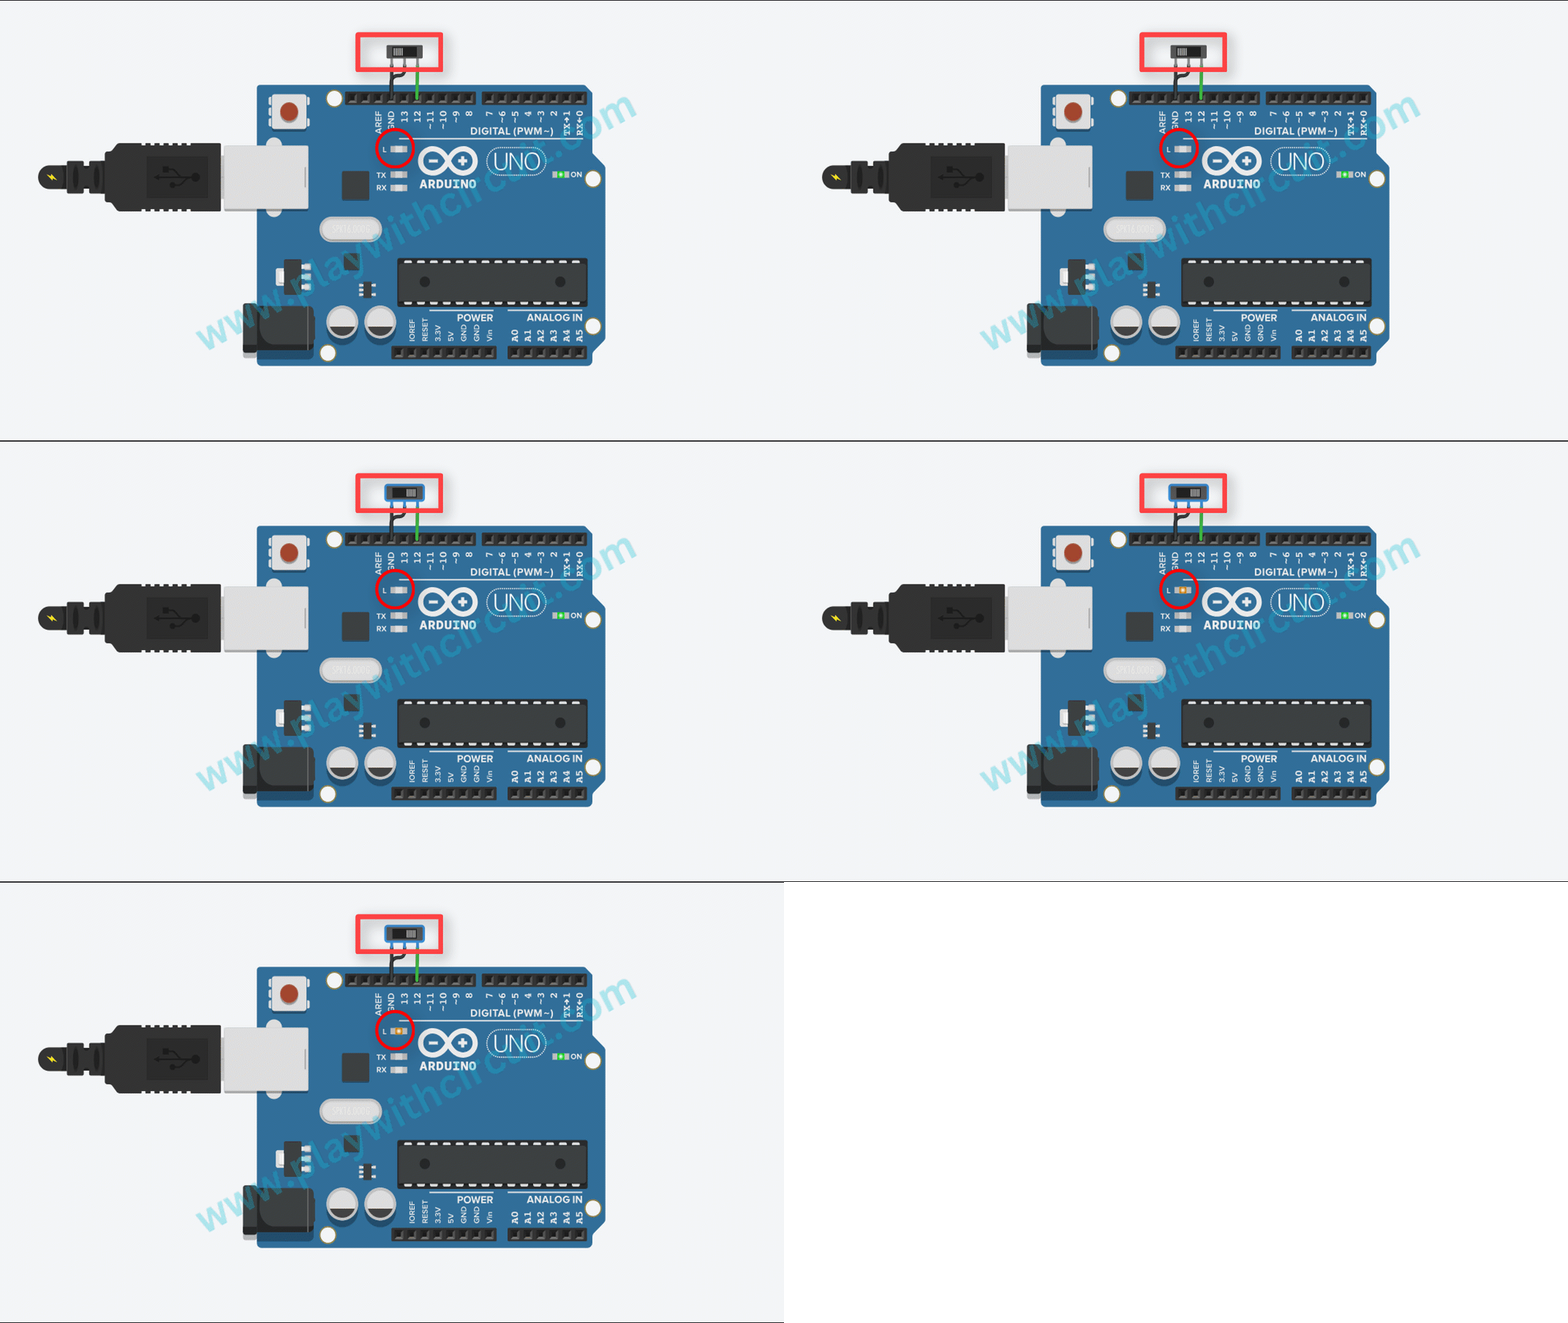
We will write a code to check if the button at pin no 12 is pressed or not and based on the input read the state of the on-board LED connected at pin 13 is decided.
Code:
// Define pin numbers
const int buttonPin = 12;  // Connect the push button to digital pin 12
const int ledPin = 13;    // Connect the LED to digital pin 13

void setup() {
  // Set the button pin as an input
  pinMode(buttonPin, INPUT_PULLUP);

  // to activate the internal pull-up resistor at the button pin
  digitalWrite(buttonPin, HIGH);

  // Set the LED pin as an output
  pinMode(ledPin, OUTPUT);

  // Initialize serial communication
  Serial.begin(9600);
}

void loop() {
  // Read the state of the button
  int buttonState = digitalRead(buttonPin);

  // If the button is pressed (buttonState is LOW)
  if (buttonState == LOW) {
    // Turn on the LED
    digitalWrite(ledPin, HIGH);
    Serial.println("Button pressed!");
  } else {
    // Turn off the LED
    digitalWrite(ledPin, LOW);
    Serial.println("Button not pressed.");
  }

  // Add a small delay to debounce the button
  delay(50);
}
Output:
Analog Input/Output Functions
analogWrite() Function
- Generates a PWM (Pulse Width Modulation) signal on a PWM-capable pin.
- Used for controlling analog-like outputs such as dimming an LED or controlling a servo motor.
- In Arduino UNO, pin no 3, 5, 6, 9, 10, 11 are PWM pins.
Syntax: analogWrite(pin, value);
Parameters:
pin Arduino pin number to write to. Data type: int.
value the duty cycle(from 0 to 255). Data type: int.
Returns: void i.e., Nothing
analogRead() Function
- Reads an analog voltage value from an analog input pin (0-1023) and returns it as an integer.
- The value read from the analog pin varies from 0 to 1023 Arduino boards contain a multichannel, 10-bit analog-to-digital converter.
- Often used for reading analog sensors like potentiometers, temperature sensors, or light sensors.
- In Arduino UNO there are 6 Analog input pins(A0 to A5).
Syntax: analogRead(pin);
Parameters:
pin name of the analog input pin to read. It can be A0, A1, A2, A3, A4, A5.
Returns: This function returns the analog reading on the input pin. Its range is decided by the resolution of the inbuilt ADC of the microcontroller. It is 0-1023 for 10 bits ADC and 0-4095 for 12 bits ADC. Data type: int.
Example:
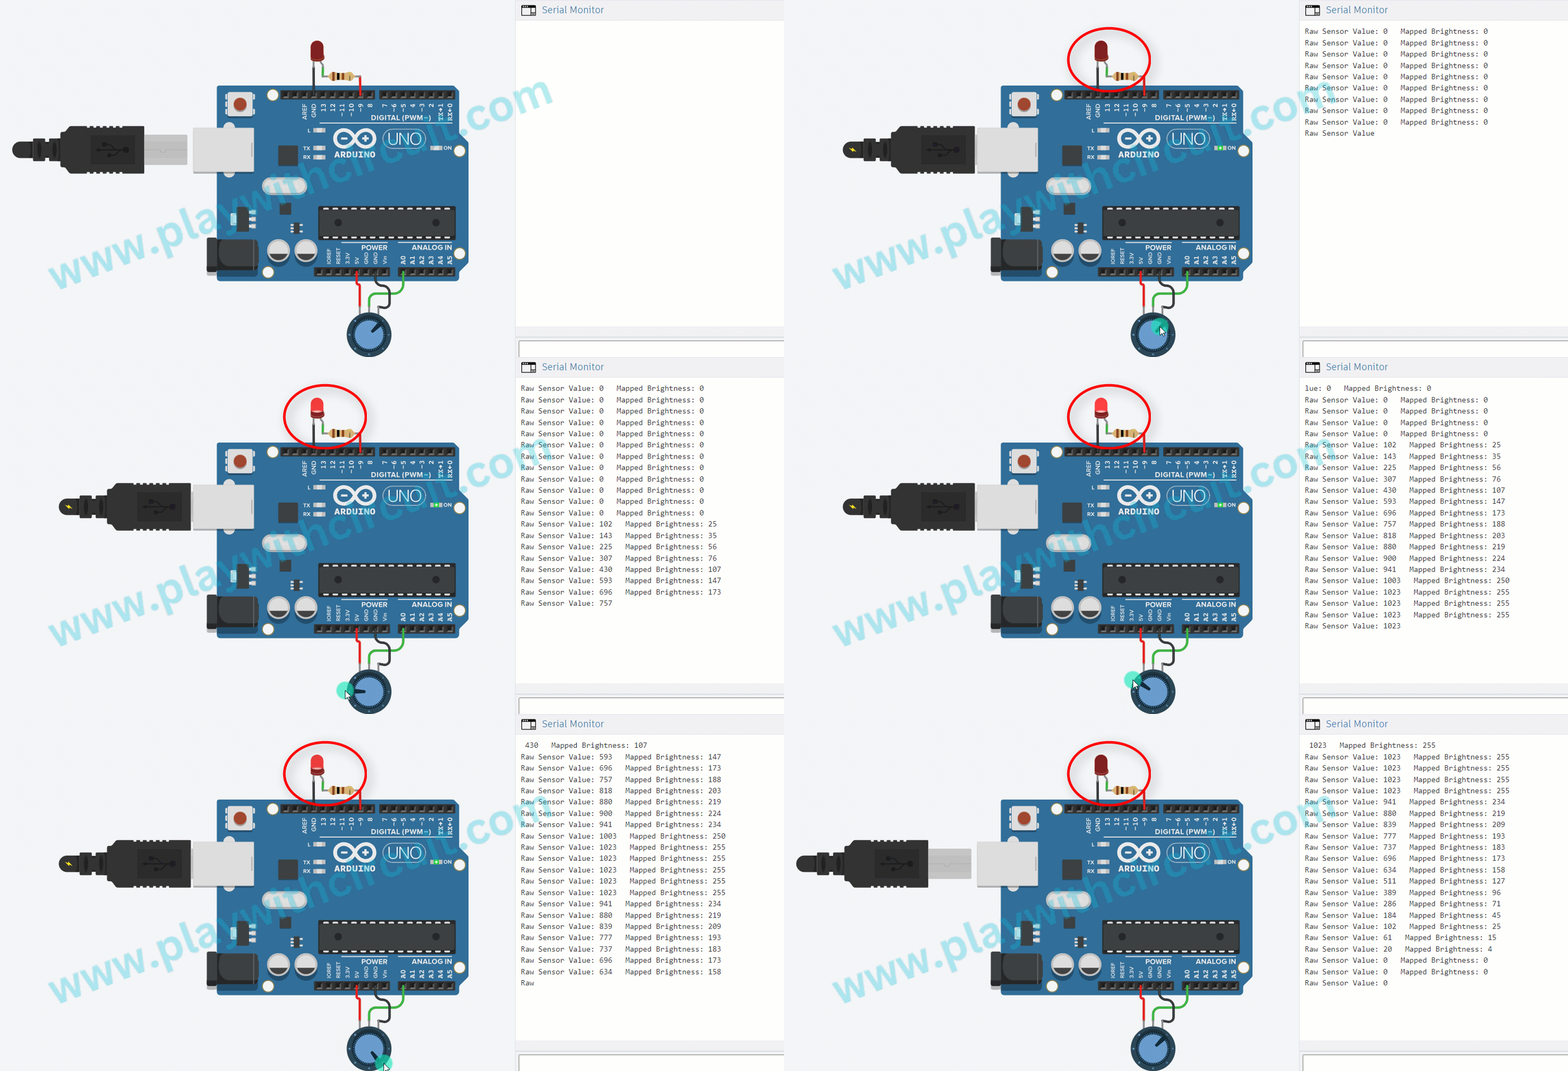
In the following code, we will change the brightness of LED connected at PWM pin 9 using a potentiometer connected at Analog input Pin A0:
// Define pin numbers
const int potPin = A0;  // Connect the center pin of the potentiometer to analog pin A0
const int ledPin = 9;   // Connect the LED to digital pin 9

void setup() {
  // Initialize serial communication
  Serial.begin(9600);

  // Set the LED pin as an output
  pinMode(ledPin, OUTPUT);
}

void loop() {
  // Read the analog value from the potentiometer
  int sensorValue = analogRead(potPin);

  // Map the analog value (0-1023) to a range suitable for analogWrite (0-255)
  int brightness = map(sensorValue, 0, 1023, 0, 255);

  // Display the raw analog value and adjusted brightness on the Serial Monitor
  Serial.print("Raw Sensor Value: ");
  Serial.println(sensorValue);
  Serial.print("Mapped Brightness: ");
  Serial.println(brightness);

  // Set the brightness of the LED using analogWrite
  analogWrite(ledPin, brightness);

  // Add a small delay for stability
  delay(100);
}
Output:
Time Functions
delay() Function
- Causes the program to pause for a specified number of milliseconds.
- Used for creating timing delays, such as blinking an LED at regular intervals.
Syntax: delay(milliseconds);
Parameters:
milliseconds Number of milliseconds required for the delay. Data type: unsigned long.
Returns: void i.e., Nothing
millis() Function
- Returns the number of milliseconds since the Arduino board started running the current program.
- Useful for managing timing, creating delays, and implementing time-based actions in your Arduino projects.
Syntax: currentTime = millis();
Parameters: None
Returns: The number of milliseconds passed since the Arduino code started. Data type: unsigned long
Example
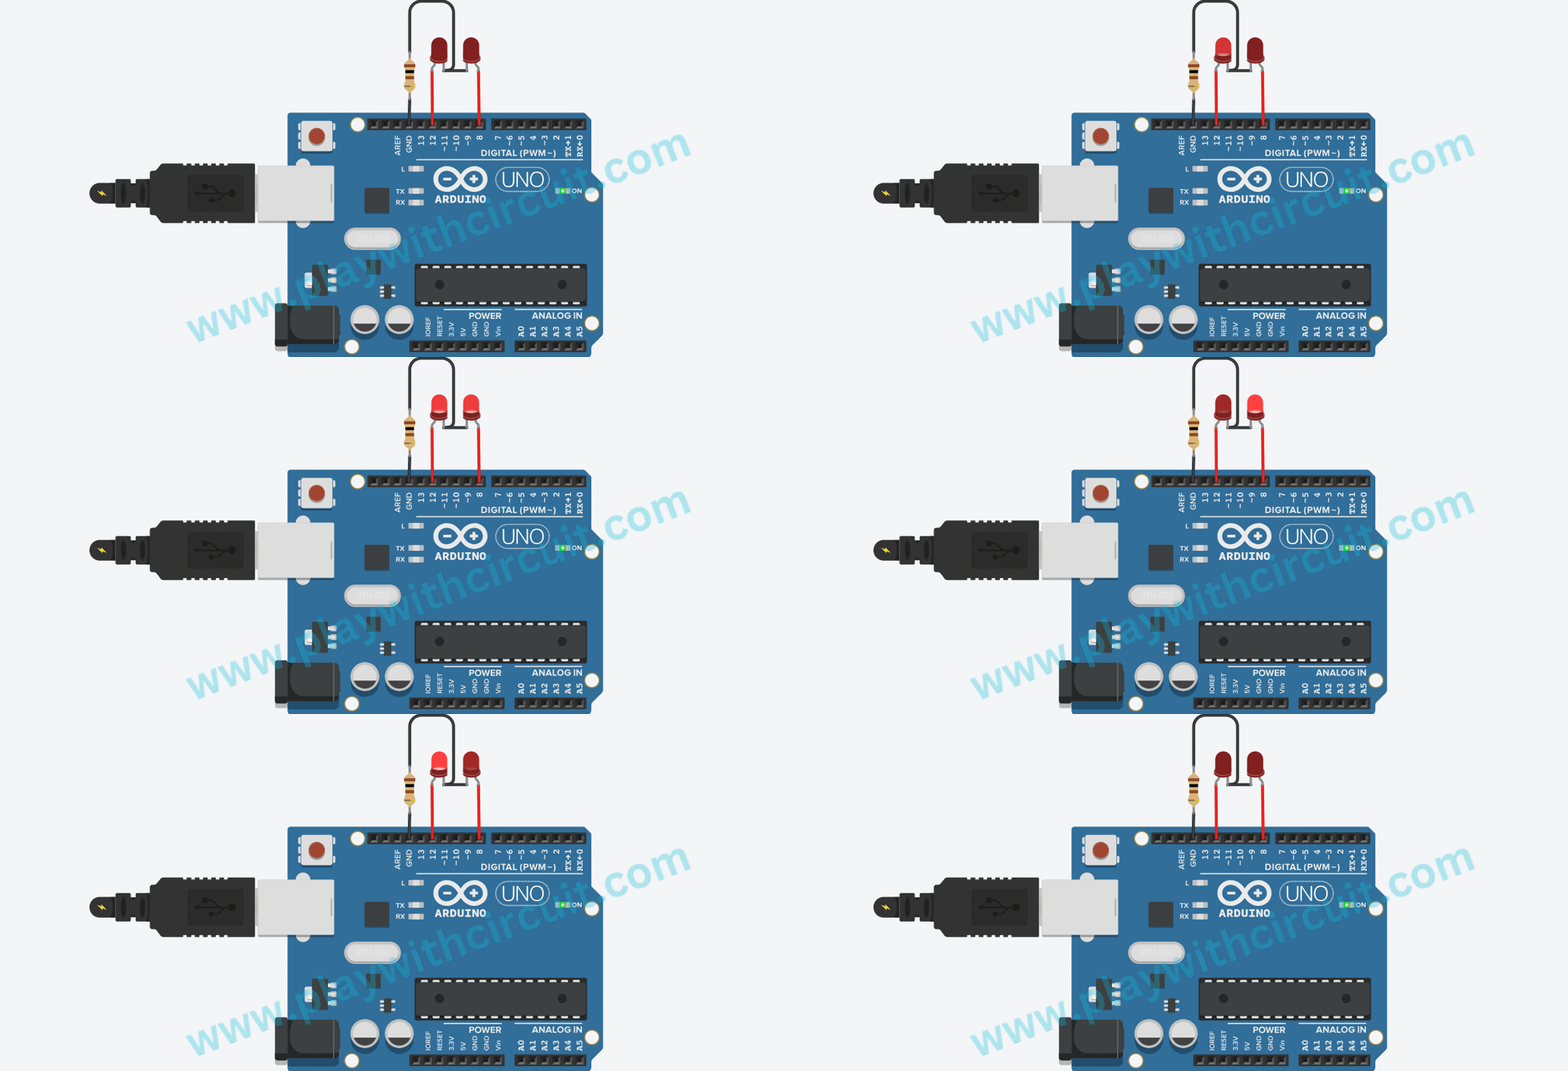
In this example, we will blink the LEDs using two methods: first using the delay() function and second using the millis() function.
-
Method 1 (delay): The LED is turned ON for 1 second, then turned OFF for 1 second using the delay function. However, during the delay, Arduino cannot do anything else.
-
Method 2 (millis): The LED is toggled every second using the millis function. This method allows Arduino to perform other tasks during the waiting period, making it non-blocking.
// Define pin numbers
const int ledPin1 = 12;  // Connect the LED to digital pin 12
const int ledPin2 = 8;   // Connect the LED to digital pin 8

// Variables for timing using millis
unsigned long previousMillis = 0;  // will store last time LED was updated
const long interval = 1000;        // interval at which to blink (milliseconds)

void setup() {
  // Set the LED pin as an output
  pinMode(ledPin1, OUTPUT);
  pinMode(ledPin2, OUTPUT);
}

void loop() {
  // Method 1: Using delay function
  digitalWrite(ledPin1, HIGH);  // Turn on the LED
  delay(1000);                  // Wait for 1 second
  digitalWrite(ledPin1, LOW);   // Turn off the LED
  delay(1000);                  // Wait for 1 second

  // Method 2: Using millis function for non-blocking timing
  unsigned long currentMillis = millis();  // Get the current time

  if (currentMillis - previousMillis >= interval) {
    // Save the last time we blinked the LED
    previousMillis = currentMillis;

    // If a second has passed, toggle the LED
    if (digitalRead(ledPin2) == LOW) {
      digitalWrite(ledPin2, HIGH);
    } else {
      digitalWrite(ledPin2, LOW);
    }
  }
  // Add other non-blocking tasks here
}
Output:
Maths Functions
In Arduino programming, you can use various maths functions to perform more complex mathematical operations. These functions are part of the Arduino core library and can be used to perform calculations in your Arduino sketches. Here are some common maths functions available in Arduino.
Square root Function
To calculate a square root of any number the function sqrt() is used in Arduino. Let’s take an example to understand it.
Syntax: sqrt(number)
Parameters:
number The number whose square root needs to be calculated. Data type: any data type.
Returns: It returns the square root of the number given in the parameter. Data type: double.
Square Function
This function is used for calculating the square of a number.
Syntax: sq(number)
Parameters:
number the number whose square needs to be calculated. Data types: any data type.
Returns: The square of the number given in parameter. Data type: double.
Power Function
Through Arduino code, we can calculate the power of a number using the pow() function.
Syntax: pow(base, exponent)
Parameters:
base This is the base number whose power needs to be raised. Data type: float.
exponent The power to which the base is raised. Data type: float.
Returns: It returns the result of the exponentiation. Data type: double
Example:
Here’s an example Arduino program that demonstrates the use of the sqrt(), sq(), and pow() functions. In this example, we’ll calculate the square root, square, and power of a number and prints the results to the Serial Monitor.
// Define a number for demonstration
float inputNumber = 9.0;

void setup() {
  // Initialize serial communication
  Serial.begin(9600);

  // Display the original number
  Serial.print("Original Number: ");
  Serial.println(inputNumber);

  // Calculate and display the square root of the number
  float sqrtResult = sqrt(inputNumber);
  Serial.print("Square Root: ");
  Serial.println(sqrtResult);

  // Calculate and display the square of the number
  float squareResult = sq(inputNumber);
  Serial.print("Square: ");
  Serial.println(squareResult);

  // Calculate and display the power of the number (in this case, raised to the power of 3)
  float powResult = pow(inputNumber, 3);
  Serial.print("Power (3): ");
  Serial.println(powResult);
}

void loop() {
  // Nothing to do in the loop for this example
}
Output:
Original Number: 9.00
Square Root: 3.00
Square: 81.00
Power (3): 729.00
The min and max functions
In Arduino IDE, the min() function is used to find the minimum of any two numbers.
Syntax: min(a, b)
Parameters:
a the first number. Allowed data types: any data type.
b the second number. Allowed data types: any data type.
Returns: It returns the smaller of the two numbers.
The max() function is used to find the maximum value of any two numbers.
Syntax: max(a, b)
Parameters
a the first number. Allowed data types: any data type.
b the second number. Allowed data types: any data type.
Returns: It returns the larger of the two numbers.
These functions are commonly used in Arduino projects for various purposes. For instance, you can use min() to find the smallest sensor reading or the minimum value in an array. Similarly, max() can be utilized to determine the highest temperature or the maximum value in a data set.
By using the min() and max() functions, Arduino programmers can easily handle comparisons and make decisions based on the smallest or largest values obtained from different sensors or inputs.
Example:
Here’s an example Arduino program that demonstrates the use of the min() and max() functions with arrays as input parameters. The program finds the minimum and maximum values in two arrays.
Code:
// Define array sizes
const int arraySize = 5;

// Define two arrays for demonstration
int array1[arraySize] = { 25, 15, 30, 10, 20 };
int array2[arraySize] = { 12, 28, 18, 22, 35 };

void setup() {
  // Initialize serial communication
  Serial.begin(9600);

  // Display the original arrays
  Serial.println("Array 1:");
  printArray(array1, arraySize);

  Serial.println("Array 2:");
  printArray(array2, arraySize);

  // Use the min() function to find the minimum values in the arrays
  int minResult[arraySize];
  for (int i = 0; i < arraySize; i++) {
    minResult[i] = min(array1[i], array2[i]);
  }

  // Display the minimum values
  Serial.println("Minimum Values:");
  printArray(minResult, arraySize);

  // Use the max() function to find the maximum values in the arrays
  int maxResult[arraySize];
  for (int i = 0; i < arraySize; i++) {
    maxResult[i] = max(array1[i], array2[i]);
  }

  // Display the maximum values
  Serial.println("Maximum Values:");
  printArray(maxResult, arraySize);
}

void loop() {
  // Nothing to do in the loop for this example
}

// Function to print an array
void printArray(int arr[], int size) {
  for (int i = 0; i < size; i++) {
    Serial.print(arr[i]);
    Serial.print("\t");
  }
  Serial.println();
}
Output:
Array 1:
25 15 30 10 20
Array 2:
12 28 18 22 35
Minimum Values:
12 15 18 10 20
Maximum Values:
25 28 30 22 35
Explanation:
In this example,
- The arrays array1 and array2 are defined with the same size.
- The min() and max() functions are used in a loop to find the minimum and maximum values for each corresponding pair of elements in the arrays.
- The printArray function is defined to print the contents of an array.
Absolute Value Function
In Arduino code, the abs() function is used to find the absolute value of a number. The absolute value represents the magnitude of a number without considering its sign.
The abs() function takes a single argument, which can be an integer or a floating-point number, and returns the absolute value of that number. If the argument is positive or zero, the function returns the number itself. If the argument is negative, the function returns its positive equivalent.
For example, |-x| = x.
The abs() function below will return the absolute value of -20, which is 20:
int x = abs(-20);
Syntax: abs(y)
Parameters:
y It is the number whose absolute value needs to be calculated.
Returns:
y if y is greater than or equal to 0.
-y if x is less than 0.
map()
map() function is useful for converting or mapping a value from one range to another. The function is particularly handy when you need to translate sensor readings or other data to a range that’s more suitable for your project.
Syntax: map(inputValue, currentLow, currentHigh, targetLow, targetHigh)
Parameters:
inputValue the input value which needs to be mapped as per range.
currentLow the lower bound of the input value’s current range.
currentHigh the upper bound of the input value’s current range.
targetLow the lower bound of the target range mapped to CurrentLow.
targetHigh the upper bound of the target range mapped to CurrentHigh.
Datatype the data type of all input parameters is signed long. It can handle negative values as well.
Returns: It returns the mapped value against inputValue. Data type: long.
Function Definition:
long map(long x, long in_min, long in_max, long out_min, long out_max) {
return (x – in_min) * (out_max – out_min) / (in_max – in_min) + out_min;
}
Trigonometric Functions
In Arduino code, you can use trigonometric functions to perform various calculations involving angles and distances. These trigonometric functions are available as part of the standard C/C++ math library and can be used in your Arduino programs to solve problems related to triangles, oscillations, rotations, and more.
The common trigonometric functions you can use in Arduino codes are sin(), cos(), tan(), etc.
The syntax for each function looks like this:
- float a = cos(rad);
- float a = sin(rad);
- float a = tan(rad);
Parameters:
rad it is the angle in radians. data type: float.
Returns:
- sin(rad): Returns the sine of rad.
- cos(rad): Returns the cosine of rad.
- tan(rad): Returns the tangent of rad.
❕Note
To use these trigonometric functions in Arduino, make sure to include the <math.h> library at the beginning of your code in an older Arduino IDE if the compilation error occurs.
Example:
Here’s an example Arduino code that demonstrates the use of the sin(), cos(), and tan() functions. In this example, we’ll calculate the sine, cosine, and tangent of an angle.
// Define an angle in radians for demonstration
float angleRadians = 0.5;  // approximately 28.65 degrees

void setup() {
  // Initialize serial communication
  Serial.begin(9600);

  // Display the original angle in degrees
  Serial.print("Angle in Degrees: ");
  Serial.println(degrees(angleRadians));

  // Calculate and display the sine of the angle
  float sinResult = sin(angleRadians);
  Serial.print("Sine: ");
  Serial.println(sinResult);

  // Calculate and display the cosine of the angle
  float cosResult = cos(angleRadians);
  Serial.print("Cosine: ");
  Serial.println(cosResult);

  // Calculate and display the tangent of the angle
  float tanResult = tan(angleRadians);
  Serial.print("Tangent: ");
  Serial.println(tanResult);
}

void loop() {
  // Nothing to do in the loop for this example
}
Output:
Angle in Degrees: 28.65
Sine: 0.48
Cosine: 0.88
Tangent: 0.55
Explanation:
The program calculates and prints the sine, cosine, and tangent of the specified angle in radians. The degrees() function is used to display the angle in degrees for better readability.
Random Number Functions
In Arduino programming, you often need to generate random numbers for various purposes, such as simulations, and generating random colors in your projects. Arduino provides functions for generating random numbers. Here are the key random number functions:
random() Function
The random() function generates a random integer within a specified range. You can define both the minimum and maximum values, and it returns a random number in that range.
Syntax: random(min, max)
Parameters:
minlower boundary of the random value, inclusive of this number (optional parameter).
maxupper boundary of the random value, exclusive of this number (required parameter).
Returns: It returns a random number between min and max-1. Data type: long.
randomSeed() Function
The randomSeed() function initializes the random number generator with a seed value. Using this function with different seeds can produce different sequences of random numbers.
Syntax: randomSeed(seed)
Parameters
seed It is a non-zero number, used to initialize the pseudo-random sequence produced by random() function.
Data types unsigned long int.
Returns: void i.e., nothing
Example:
In this example we will use random() function to generates pseudo-random numbers. If you want to get different sequences of random numbers each time you run your program, you can use randomSeed() to initialize the random number generator with a seed value. Like it is being done in our program.
Here’s an example code demonstrating the use of random() and randomSeed().
Code:
// Define the range for random numbers
const int minRandomValue = 10;
const int maxRandomValue = 100;

void setup() {
  // Initialize serial communication
  Serial.begin(9600);

  // Seed the random number generator with an analog pin value
  randomSeed(analogRead(A0));

  // Generate and print five random numbers
  for (int i = 0; i < 5; i++) {
    int randomNumber = random(minRandomValue, maxRandomValue + 1);
    Serial.print("Random Number ");
    Serial.print(i + 1);
    Serial.print(": ");
    Serial.println(randomNumber);
    delay(500);  // Add a delay for better randomness (optional)
  }
}

void loop() {
  // Nothing to do in the loop for this example
}
Output1:
Random Number 1: 94
Random Number 2: 18
Random Number 3: 77
Random Number 4: 37
Random Number 5: 21
Output 2:
Random Number 1: 38
Random Number 2: 83
Random Number 3: 40
Random Number 4: 63
Random Number 5: 37
Explanation:
In this example,
- randomSeed(analogRead(A0)): Seeds the random number generator with an analog pin’s value. Using an analog pin value for the seed helps introduce some unpredictability to the random number sequence.
- random(min, max): Generates a random number in the specified range. The range is inclusive, so random(min, max) can generate numbers from min to max, including both.
The program generates and prints five random numbers within the specified range. The delay(500) is optional and adds a small delay between each random number generation for better randomness. Every time board power up a random sequence is generated.
If we want to generate same sequence every time board is powered up, then replace below code line:
randomSeed(analogRead(A0));
with this one
randomSeed(1);
By changing this line in code we get:
Output1:
Random Number 1: 73
Random Number 2: 66
Random Number 3: 54
Random Number 4: 72
Random Number 5: 65
Output2:
Random Number 1: 73
Random Number 2: 66
Random Number 3: 54
Random Number 4: 72
Random Number 5: 65
Bits and Bytes manipulation Functions
Bit manipulation functions in Arduino allow you to work with individual bits within a byte or integer data type. These functions are useful for tasks like setting or clearing specific bits, reading bit values or checking and altering individual flags within a variable. Similarly, Byte manipulation functions are used to extract MSB or LSB from the integer value. Here are the commonly used bit and byte manipulation functions in Arduino.
bitRead() Function
The bitRead() function reads the value of a specific bit within a byte or an integer.
Syntax: bitRead(number, n)
Parameters:
number the numeric variable from which the nth bit is to be read.
n bit number to read, starting from 0 (for the least significant or rightmost bit).
Datatype The parameter can be of any datatype except float and double.
Returns: It returns the value of the nth bit in the parameter ‘number’. It can be (0 or 1).
Example:
byte data = B01011011;
int bitValue = bitRead(data, 3); // Reads the value of the 3rd bit, which is 1.
bitWrite() Function
The bitWrite() function sets or clears a specific bit within a byte or an integer, depending on the desired value (0 or 1).
Syntax: bitWrite(number, n, b)
Parameters:
number The numeric variable to which the nth bit is to be written.
n bit number to write, starting from 0 (for the least significant or rightmost bit).
b the value to write to the nth bit. It can be (0 or 1).
Returns: void i.e., Nothing
It changes the parameter number. Hence the parameter number is to be validated to check the output of the bitWrite() function.
Example:
byte data = B11010011;
bitWrite(data, 2, 0); // Clears the 2nd bit, resulting in B11010011 -> 0xD3
bitSet() Function
The bitSet() function sets a specific bit within a byte or an integer to 1.
Syntax: bitSet(number, n)
Parameters:
number the numeric variable to which the nth bit is to be set.
n bit number to set, starting from 0 (for the least significant or rightmost bit).
Returns: void i.e., Nothing
Example:
byte data = B00101000;
bitSet(data, 4); // Sets the 4th bit to 1, resulting in B00101100 -> 0x2C
bitClear() Function
The bitClear() function clears a specific bit within a byte or an integer, setting it to 0.
Syntax: bitClear(number, n)
Parameters:
number the numeric variable to which the nth bit is to be cleared.
n bit number to clear, starting from 0 (for the least significant or rightmost bit).
Returns: It returns the value of the numeric variable after the nth bit is cleared.
Example:
byte data = B11101101;
bitClear(data, 5); // Clears the 5th bit, resulting in B11001101 -> 0xCD
bit() Function
The bit() function creates a value with a specific bit. This is often used for constructing bit masks or working with specific bits.
e.g., if input parameter is 1 it returns 2, if it is 2 it returns 4
Syntax: bit(n)
Parameters
n the bit number whose value to compute.
Returns: It returns the calculated numeric value in which the nth bit is 1 and the other lower bits are 0.
Example:
byte mask = bit(3); // Creates a byte with only the 3rd bit set to 1: B00001000 -> 0x08highByte() Function
It extracts the higher-order byte (most significant byte) from a binary value or data when the input number is a word which consists of two bytes for Arduino UNO microcontroller. If the numeric value is of larger datatype then it returns second lowest byte.
It is often necessary when working with data that is stored in a binary format or when you need to separate a value into its upper and lower parts for processing.
Syntax: highByte(x)
Parameters
x a value of any type of variable.
Returns: It returns the byte extracted.
Example:
def highbyte(value):
    # Masking with 0xFF (hexadecimal for 11111111) extracts the high byte.
    high_byte = (value >> 8) & 0xFF
    return high_byte
lowByte() Function
The lowByte() function is used to extract the lowest byte (least significant byte) from a binary value, more often a word value is the input parameter.
Syntax: lowByte(x)
Parameters
x a value of any type of variable.
Returns:
It returns the rightmost byte. Data type: byte.
Example:
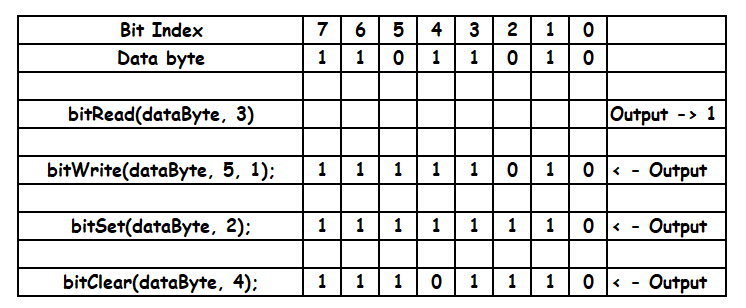
Here’s an Arduino program that demonstrates the use of bitRead(), bitWrite(), bitSet(), bitClear(), bit(), highByte(), and lowByte() functions.
Code:
// Define a variable for demonstration
int dataByte = 0b11011010;                  // Binary representation: 01011010
unsigned int a_word = 0xABCD;               // A word in arduino UNO consists of 2 bytes i.e four nibbles (nibble consists of 4 bits)
unsigned long int a_long_int = 0x11223344;  // unsigned long int contains 4 bytes i.e 8 nibbles (nibble consists of 4 bits)
void setup() {
  // Initialize serial communication
  Serial.begin(9600);

  // Display the original data byte
  Serial.print("Original Data Byte: ");
  Serial.println(dataByte, BIN);

  // Use bitRead to read the value of a specific bit
  int bitValue = bitRead(dataByte, 3);
  Serial.print("Value of Bit 3: ");
  Serial.println(bitValue);

  // Use bitWrite to set the value of a specific bit
  bitWrite(dataByte, 5, 1);  // Set bit 5 to 1
  Serial.print("Data Byte after setting Bit 5: ");
  Serial.println(dataByte, BIN);

  // Use bitSet to set the value of a specific bit
  bitSet(dataByte, 2);  // Set bit 2 to 1
  Serial.print("Data Byte after setting Bit 2: ");
  Serial.println(dataByte, BIN);

  // Use bitClear to clear the value of a specific bit
  bitClear(dataByte, 4);  // Clear bit 4 (set to 0)
  Serial.print("Data Byte after clearing Bit 4: ");
  Serial.println(dataByte, BIN);

  // Use bit() to create a value with a single bit set
  int newBitValue = bit(7);  // Create a value with only bit 7 set
  Serial.print("New Data Byte with only Bit 7 set: ");
  Serial.println(newBitValue, BIN);
  {
    // Use highByte() to extract the high byte of an int
    int highByteValue = highByte(a_word);
    Serial.print("High Byte of Data Byte: ");
    Serial.println(highByteValue, HEX);

    // Use lowByte() to extract the low byte of an int
    int lowByteValue = lowByte(a_word);
    Serial.print("Low Byte of Data Byte: ");
    Serial.println(lowByteValue, HEX);
  }
  {
    // Use highByte() to extract the high byte of a long int
    int highByteValue = highByte(a_long_int);
    Serial.print("High Byte of Data Byte: ");
    Serial.println(highByteValue, HEX);

    // Use lowByte() to extract the low byte of a long int
    int lowByteValue = lowByte(a_long_int);
    Serial.print("Low Byte of Data Byte: ");
    Serial.println(lowByteValue, HEX);
  }
}

void loop() {
  // Nothing to do in the loop for this example
}
Output:
Original Data Byte: 11011010
Value of Bit 3: 1
Data Byte after setting Bit 5: 11111010
Data Byte after setting Bit 2: 11111110
Data Byte after clearing Bit 4: 11101110
New Data Byte with only Bit 7 set: 10000000
High Byte of Data Byte: AB
Low Byte of Data Byte: CD
High Byte of Data Byte: 33
Low Byte of Data Byte: 44
Character Functions
isAlphaNumeric() Function
The isAlphaNumeric() function is used to determine whether a character is alphanumeric or not. It checks whether the character is either a letter (A-Z or a-z) or a digit (0-9). It returns a non-zero value if the character is alphanumeric and returns zero if the character is not alphanumeric. This function is the same as isAlpha() function.
Syntax: isAlphaNumeric(testChar)
Parameters:
testChar Character to be tested. Datatype: char.
Returns: true if testChar is an alphanumeric character.
Function definition:
// Function to check if a character is alphanumeric
bool isAlphaNumeric(char c) {
return (c >= ‘0’ && c <= ‘9’) || (c >= ‘A’ && c <= ‘Z’) || (c >= ‘a’ && c <= ‘z’);
}
isUppercase() Function
This function is used to check if a character is an uppercase letter of English alphabets.
Syntax: isUpperCase(testChar)
Parameters:
testChar Character to be tested. Datatype: char.
Returns: true if testChar is upper case letter.
Function definition:
// Function to check if a character is uppercase
bool isUpperCase(char c) {
return (c >= ‘A’ && c <= ‘Z’);
}
isLowercase() Function
The lowercase function is used to determine if the character is written in small letters of English alphabets.
Syntax: isLowerCase(testChar)
Parameters:
testChar Character to be tested. Datatype: char.
Returns: true if testChar is lower case letter.
Function definition:
// Function to check if a character is lowercase
bool isLowerCase(char c) {
return (c >= ‘a’ && c <= ‘z’);
}
isAscii() Function
isAscii function used to check if a character is a valid 7-bit ASCII character, which means it falls within the range of 0 to 127 in ASCII values.
Syntax: isAscii(testChar)
Parameters:
testChar Character to be tested. Datatype: char.
Returns: true if testChar is a 7 bit ASCII character .
Function definition:
// Function to check if a character is ASCII
bool isAscii(char c) {
return (c >= 0 && c <= 127);
}
IsControl() Function
It checks if a character is a control character. Control characters are non-printable characters such as line feeds, carriage returns, and other special control codes. These characters often have ASCII values in the range 0 to 31.
Syntax: isControl(testChar)
Parameters:
testChar Character to be tested. Datatype: char.
Returns: true if testChar is a control character.
Function definition:
// Function to check if a character is a control character
bool isControl(char c) {
return (c >= 0 && c <= 31) || (c == 127);
}
isGraph() Function
It checks if a character is a printable, graphical character (i.e., not a control character or space). These characters typically have ASCII values in the range 32 to 126, excluding space (32) because space is printable character but it has no content.
Syntax: isGraph(testChar)
Parameters:
testCharCharacter to be tested. Datatype: char.
Returns: true if testChar is printable character.
Function definition:
// Function to check if a character is a graphical character
bool isGraph(char c) {
return (c > 32 && c <= 126);
}
Example:
Below is an Arduino program that demonstrates the functionality of the requested functions: isAlphaNumeric(), isUpperCase(), isLowerCase(), isAscii(), isControl(), and isGraph().
Code:
void setup() {
  Serial.begin(9600); // Initialize serial communication
}

void loop() {
  char testChar = 'A';

  // Demonstrate isAlphaNumeric function
  Serial.print("Is '");
  Serial.print(testChar);
  Serial.print("' alphanumeric? ");
  if (isAlphaNumeric(testChar)) {
    Serial.println("Yes");
  } else {
    Serial.println("No");
  }

  // Demonstrate isUpperCase function
  Serial.print("Is '");
  Serial.print(testChar);
  Serial.print("' uppercase? ");
  if (isUpperCase(testChar)) {
    Serial.println("Yes");
  } else {
    Serial.println("No");
  }

  // Demonstrate isLowerCase function
  Serial.print("Is '");
  Serial.print(testChar);
  Serial.print("' lowercase? ");
  if (isLowerCase(testChar)) {
    Serial.println("Yes");
  } else {
    Serial.println("No");
  }

  // Demonstrate isAscii function
  Serial.print("Is '");
  Serial.print(testChar);
  Serial.print("' ASCII character? ");
  if (isAscii(testChar)) {
    Serial.println("Yes");
  } else {
    Serial.println("No");
  }

  // Demonstrate isControl function
  Serial.print("Is '");
  Serial.print(testChar);
  Serial.print("' control character? ");
  if (isControl(testChar)) {
    Serial.println("Yes");
  } else {
    Serial.println("No");
  }

  // Demonstrate isGraph function
  Serial.print("Is '");
  Serial.print(testChar);
  Serial.print("' graphical character? ");
  if (isGraph(testChar)) {
    Serial.println("Yes");
  } else {
    Serial.println("No");
  }

  while(1); // stuck here
}
Output:
Is ‘A’ alphanumeric? Yes
Is ‘A’ uppercase? Yes
Is ‘A’ lowercase? No
Is ‘A’ ASCII character? Yes
Is ‘A’ control character? No
Is ‘A’ graphical character? Yes

